First of all, if you are new to web development, AJAX is Asynchronous Javascript and XML. It was so named after Google's use of the technology to power Google Mail, and although Google used XML in the early days, the more popular means of transmitting data between client and server (and vice versa) these days is HTML, plain text or Javascript Object Notation (JSON). In short, however, AJAX uses Javascript behind the scenes to send asynchronous requests to the server, and to update parts of a web page according to the response. The key benefit of this approach is that it avoids full page post backs and refreshes. This can offer the user a much smoother experience than they would otherwise be treated to. Probably the most popular Javascript library is jQuery. It's been designed to provide simple to use wrappers around complex Javascript functionality, which makes it relatively easy for beginners to create fantastic effects with little Javascript knowledge. In fact, jQuery is so impressive that Microsoft ditched their own client-side javascript library in favour of supporting jQuery.
If you are not new to web development, apologies for not advising you to skip the previous paragraph...
At the moment, jQuery is part of the template for a new MVC or Web Forms application if you are using Visual Web Developer or Visual Studio. A Scripts folder is autogenerated and populated with a variety of javascript files, including a version of the jQuery core library and validation library. The Beta version of WebMatrix doesn't include this convenience, even though jQuery is required to take advantage of the AJAX sorting and paging offered by the WebGrid helper. Whether this will change in a future release is not known (by me, at least...) at the moment. Consequently, if you are playing along while reading this article, you need to obtain the jQuery files yourself (although they are available in the download provided at the end of this article).
The first file you will need is the latest jQuery library, and then you need to navigate to the UI download part of the site. Without giving too much away, choose all of the UI Core parts, and then choose Draggable and Resizable from the Interactions section, followed by Button, Dialog and DatePicker from Widgets. Finally, select Highlight from the Effects section, which will ensure that Core is automatically also selected for you. I left the theme as the default UI Lightness, although you can choose any you prefer. Once you click download, you get a little package which includes a customised js file and css for your chosen theme and components.
Now to the sample. As I mentioned before, this example simply shows how to insert a record into a database. The database itself is the Books database I built for previous articles. To keep things simple, I shall just focus on the core parts of the "application" to illustrate how things are done, without any real validation or error handling. We can always look to enhance the pages at some other time. To start with, I will give a quick overview of how this sample works.
The main part of the sample is a single page called Default.cshtml, which contains a data entry form for adding books, and a grid to display the current data. A button will invoke the form in a modal dialog, and when the form has been filled and submitted, the grid will refresh to show the new book entry at the top of the page of data. The grid itself is generated from a second file called BookGrid.cshtml, which is included in Default.cshtml using the RenderPage() method introduced here. The method for adding an entry into the database is also housed in a separate file for convenience.
Here's the code for the data entry form in Default.cshtml:
    <div id="dialog-form-add" title="Add New Book">
    <form id="add-book-form" action="@Href("~/Methods/AddBook")">
         <div class="row">
                <span class="label"><label for="title">Title:</label></span>
                <input type="text" name="title" id="title" size="50" />
            </div>
            <div class="row">
                <span class="label"><label for="isbn">ISBN:</label></span>
                <input type="text" name="isbn" id="isbn" size="20" />
            </div>
            <div class="row">
                <span class="label"><label for="description">Description:</label></span>
                <textarea cols="50" rows="8" name="description" id="description"></textarea>
            </div>
            <div class="row">
                <span class="label"><label for="authorId">Author:</label></span>
                <select name="authorId" id="authorId">
                    <option value="">-- Select Author --</option>
                @{
                    foreach(var author in authors){
                        if(author.AuthorId == Request["authorId"].AsInt()){
                            <option value="@author.AuthorId" selected="selected">@author.AuthorName</option>
                        } else {
                            <option value="@author.AuthorId">@author.AuthorName</option>
                        }
                    }
                }
                </select>
            </div>
            <div class="row">
                <span class="label"><label for="categoryId">Category:</label></span>
                <select name="categoryId" id="categoryId">
                    <option value="">-- Select Category --</option>
                @{
                    foreach(var category in categories){
                        if(category.CategoryId == Request["categoryId"].AsInt()){
                            <option value="@category.CategoryId" selected="selected">@category.Category</option>
                        } else {
                            <option value="@category.CategoryId">@category.Category</option>
                        }
                    }
                }
                </select>
            </div>
            <div class="row">
                <span class="label"><label for="datePublished">Date Published:</label></span>
                <input type="text" id="datePublished" name="datePublished" />
            </div>
        </form>
    </div>
This form is almost identical to the basic data entry form I produced for a previous article on adding and editing data in WebMatrix. There are three differences - the action attribute for the form points to a different URL /Methods/AddBook, and the form is wrapped in a div. Finally, the form has been given an ID so that it can be referenced easily using jQuery. At the top of the page, some code is added which gets data out of the database to populate the dropdown lists for Authors and Categories:
@{
    if(IsPost){
        var db = Database.Open("Books");
        var sql = "INSERT INTO Books (Title, ISBN, Description, AuthorId, CategoryId, DatePublished) " +
            "VALUES (@0, @1, @2, @3, @4, @5)";
        var title = Request["title"];
        var isbn = Request["isbn"];
        var description = Request["description"];
        var authorId = Request["authorId"];
        var categoryId = Request["categoryId"];
        var datePublished = Request["datePublished"];
        db.Execute(sql, title, isbn, description, authorId, categoryId, datePublished);
    }
}
Next, some code is required to retrieve data for the grid, and to generate the html. This is in a file called BookGrid.cshtml, and is placed in a folder called Partials:
@{
    var db = Database.Open("Books");
    var books = db.Query("SELECT BookId, Title, ISBN, Description, " +
        "FirstName + ' ' + LastName AS AuthorName, Category " +
        "FROM Books INNER JOIN Authors ON Books.AuthorId = Authors.AuthorId " +
        "INNER JOIN Categories ON Books.CategoryId = Categories.CategoryId ORDER BY BookId DESC");
    var grid = new WebGrid(books, ajaxUpdateContainerId: "grid");
}
@grid.GetHtml(tableStyle: "ui-widget ui-widget-content",
                    headerStyle: "ui-widget-header",
                    columns: grid.Columns(
                    grid.Column("Title"),
                    grid.Column("AuthorName",
                                    header: "Author"),
                    grid.Column("Category"),
                    grid.Column("ISBN")
                )
    )
You should notice a couple of things. First, the grid is Ajaxified in that the ajaxUpdateContainerId property is specified in the constructor. More about this and the WebGrid helper itself can be found here. Second, the table and header styles have been taken from the jQuery theme css. You'll see how that looks a bit later. But essentially, all this file does is to render an html <table> with data in it. This file needs to be referenced from within the Default.cshtml file so that the rendered table can be included together with a button for adding new books:
<div id="grid" class="ui-widget">
    @RenderPage("~/Partials/BookGrid.cshtml")
</div>

<p><button id="add-book">Add New Book</button></p>
If you run the page now, it will look a mess. We need to reference some CSS files and the jQuery files, and then use jQuery to work some magic. First, in the head area of Default.cshtml, this gets added:
<title>Manage Books</title>
<link type="text/css" href="@Href("~/Styles/jquery-ui-1.8.4.custom.css")" rel="stylesheet" />
<link type="text/css" href="@Href("~/Styles/StyleSheet.css")" rel="stylesheet" />
<script type="text/javascript" src="@Href("~/Scripts/jquery-1.4.2.min.js")"></script>
<script type="text/javascript" src="@Href("~/Scripts/jquery-ui-1.8.4.custom.min.js")"></script>
Now to the main bulk of the jQuery. All the code appears here, followed by an explanation for it
$(function () {
    $('#dialog-form-add').dialog({
        autoOpen: false,
        modal: true,
        height: 425,
        width: 475,
        buttons: {
            'Add Book': function () {
                $.ajax({
                    type: "POST",
                    url: $("#add-book-form").attr('action'),
                    data: $("#add-book-form").serialize(),
                    dataType: "text/plain",
                    success: function (response) {
                        $('#dialog-form-add').dialog('close');
                        $("#grid").load('/Default/ #grid', function () {
                            $('tbody > tr:first')
                        .effect("highlight", {}, 2000);
                        });
                    },
                    error: function (response) {
                        alert(response);
                        $('#dialog-form').dialog('close');
                    }
                });
            },
            Cancel: function () {
                $('#dialog-form-add').dialog('close');
            }
        }
    });
    $('#datePublished').datepicker({ dateFormat: 'yy-mm-dd' });


    $('#add-book')
    .button().click(function () {
        $('#dialog-form-add').dialog('open');
    });
});
The first part of the code creates a modal dialog from the contents of the dialog-form div. This has the effect of hiding it from view when the page is requested. Some options are set in terms of the height and width of the resulting modal dialog, along with an argument that tells the form not to open automatically. Then the buttons on the modal form are added. One is called Add Book, and on clicking that, jQuery is used to serialise the contents of the form and post it asynchronously to the Methods/AddBook URL. This URL actually resolves to a file called AddBook.cshtml in a folder called Methods. We'll look at what that does later. If this AJAX call is successful, the modal form is closed, and the div with the id of "grid" is loaded with just the right piece of html obtained as a result of asynchronously requesting the Default.cshtml file. The jQuery Highlight effect is applied to the newly added book. The Cancel button is simply wired up to ensure the modal form closes.
There are just two remaining jobs for jQuery. One is to apply the jQuery Datepicker to the Date Published input so that you can control the format that data is entered into this box. And lastly, the Add Book button is given a bit of a jQuery makeover to look nice, before having its click event wired up to open the modal form. Really all quite simple.
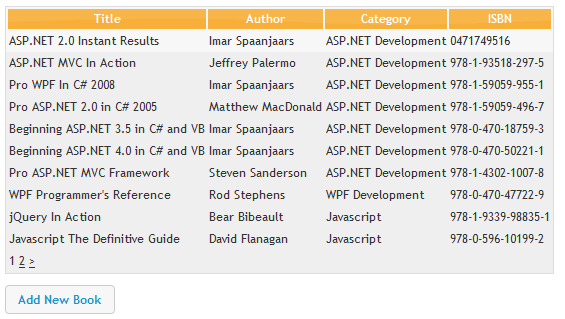
This is how the page looks on first request:

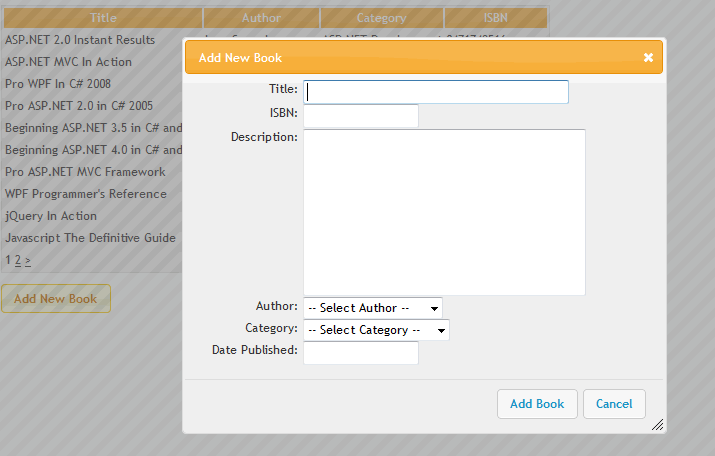
On clicking the Add New Book button, the modal form appears:

And finally, when the Add Book button is clicked, the Methods/AddBook.cshtml file is requested with the form values passed in the Request.Form collection:
@{
    if(IsPost){
        var db = Database.Open("Books");
        var sql = @"INSERT INTO Books (Title, ISBN, Description, AuthorId, CategoryId, DatePublished)
                    VALUES (@0, @1, @2, @3, @4, @5)";
        var title = Request["title"];
        var isbn = Request["isbn"];
        var description = Request["description"];
        var authorId = Request["authorId"];
        var categoryId = Request["categoryId"];
        var datePublished = Request["datePublished"];
        db.Execute(sql, title, isbn, description, authorId, categoryId, datePublished);
    }
}
This code checks to make sure that it is being requested as a POST, and then searches the Request.Form collection for the values it expects. Having obtained them, they are passed as parameter values into the SQL which adds the new book to the database.
That's it. jQuery form, simply done. However, as I stated at the beginning of the article, much more should be done in a proper application. For example, the values passed in to AddBook.cshtml chould be validated to ensure that they are of the correct type and within expected ranges. This should be done on the server, and as a convenience to users, some validation should also be provided within the jQuery form itself. In a future article, I shall concentrate on this aspect of web development in more detail. In the meantime, feel free to experiment with the code provided in the download here.
