Integrated Windows Authentication is the preferred approach to authentication whenever users are part of the same Windows domain as the server. Users are authenticated against an existing identity store such as Active Directory, and their credentials are not transmistted across the Internet. In addition, users are provided with a seamless experience, as they only need to log in to Windows, and their browser and IIS take care of managing authentication from then on. There are a number of alternatives to Integrated Windows Authentication: Basic, Digest and Client Certificate, but only Integrated Windows Authentication provides strong authentication without the hassle of managing client certificates. It is therefore the recommended option.
Configuring Integrated Windows Authentication is quite straightforward, but there are a number of steps that need to be followed. The first step is to change the web.config file to specify that Windows Authentication is to be used for the site:
<?xml version="1.0" encoding="utf-8" ?>
<configuration>
    <appSettings>
        <add key="EnableSimpleMembership" value="false" />
    </appSettings>

    <system.web>
        <compilation debug="true" targetFramework="4.0" />
        <authentication mode="Windows" />

    </system.web>
</configuration>
There are three items to note: first, an appSettings entry is added to turn off SimpleMembership, which relies on Forms Authentication. Then, within the system.web node, the authentication mode is set to Windows.
The next step is to ensure that your web server is set up to manage Windows Authentication for the site. To do this, you need to explicitly disable anonymous access (which allows anyone to access the site withoiut havng to authenticate) and enable Windows Authentication. WebMatrix doesn't offer any GUI management tools for IIS Express, so you need to locate the applicationhost.config file (typically located in C:\Users\<your_username>\Documents\IISExpress\config). Having done that, navigate all the way to the bottom where you should find the closing </configuration> tag. Add the following, where "Windows Auth" is the name of your site:
	<location path="Windows Auth">
        <system.webServer>
            <security>
                <authentication>
                    <anonymousAuthentication enabled="false" />
                    <windowsAuthentication enabled="true" />
                </authentication>
            </security>
        </system.webServer>
    </location>
</configuration> <-- left in to help with positioning -->
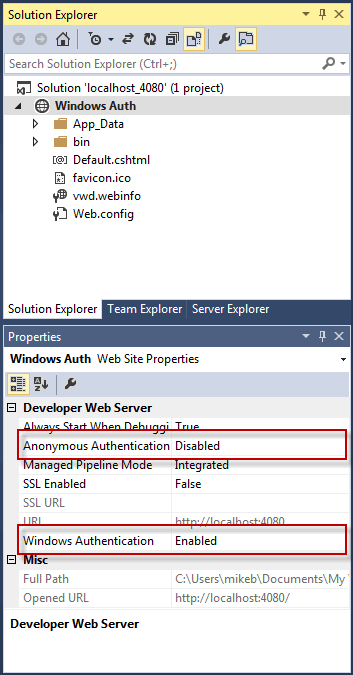
Visual Studio Express for Web does provide a visual means to manage these settings: you can configure them with two clicks in the site properties:
There is an alternative way to disable anonymous access to the site, and that is to add the following to your web.config file within the system.web node:
<authorization>
    <deny users="?"/>
</authorization>
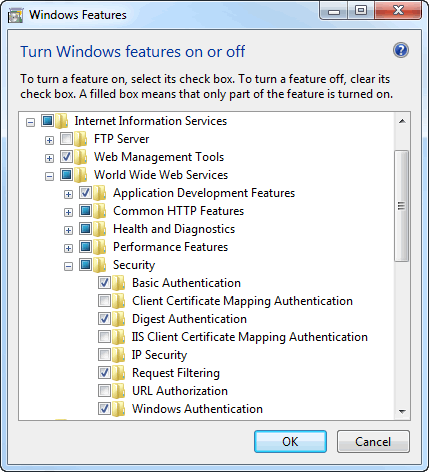
When you deploy the site to the full version of IIS, you can use the standard IIS administrative tools to manage configuration. First, you need to ensure that Windows Authentication is enabled for the web server. You can do this by going to Control Panel » Programs and Features, and then clicking Turn Windows features on or off (left hand side). Locate Internet Information Services and then drill down to Security and ensure that Windows Authentication is checked.
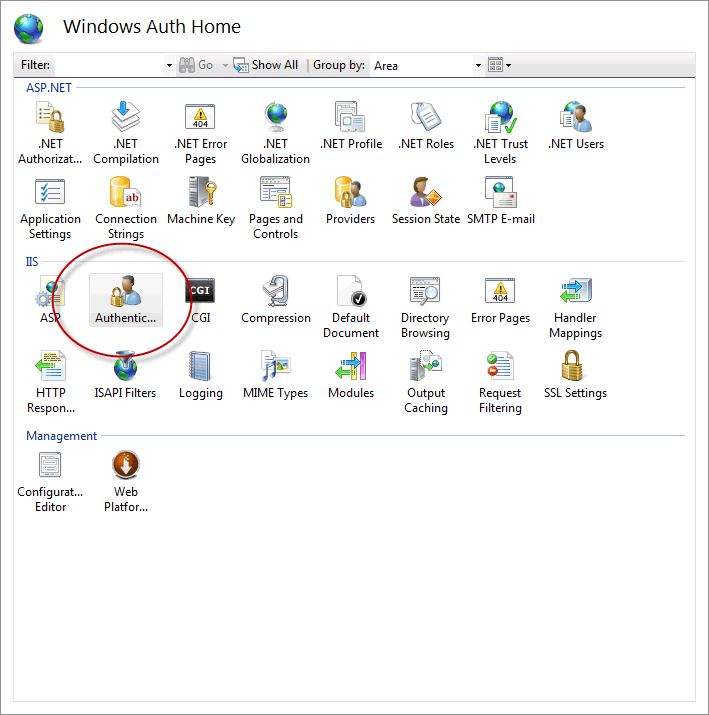
Once you have created the site in IIS, go to Feature View and click Authentication:
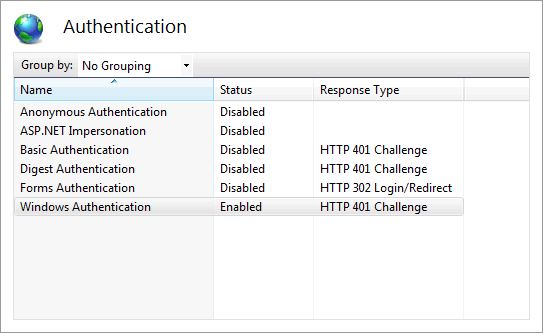
Make sure that the options are the same as you set in IIS Express: Anonymous Authentication should be disabled, and Windows Authentication enabled.
Working with users and roles
Users are logged in automatically and their identity is stored in the Identity property of the User object. The User object is an instance of the IPrincipal interface. The underlying type is the WindowsPrinciple class. You can get the name of the user from User.Identity.Name. The value returned from this is in the form DomainName\UserName or MachineName\UserName. For example, if I have a Windows login for a domain called CONTOSO01, the value returned by User.Identity.Name might be CONTOSO01\mikebrind.
Some parts of the Intranet might only be accessible to members of certain Windows groups (roles) such as Administrator or Sales. In order to determine whether the current user belongs to a specific group, you use the User.IsInRole method:
@if(User.IsInRole(@"BUILTIN\Administrators") || User.IsInRole(@"DOMAIN\Sales")){
    <div>Is an administrator or sales person</div>
}
You can also use an override of the IsInRole method that takes a WindowsBuiltInRole enumeration, although you have to cast the User object to a WindowsPrincipal to use this option:
@using System.Security.Principal;
@{
    var user = (WindowsPrincipal)User;
    if(user.IsInRole(WindowsBuiltInRole.Administrator)){
        //user is an administrator
    }
}
Note that you also need to add a using directive to reference the System.Security.Principal namespace. Enumerations are good, in that Intellisense offers code completion and compile time checking, but you can't use this approach to test for membership of custom groups that you have created such as the Sales one illustrated earlier.
You can't do very much with groups or roles when using Windows Authentication. However, you can activate the WindowsTokenRoleProvider if you do need to make use of its limited features. To do this, add the following to your web.config within the system.web node:
<roleManager enabled="true" defaultProvider="WindowsProvider">
    <providers>
        <clear />
        <add name="WindowsProvider" type="System.Web.Security.WindowsTokenRoleProvider" />
    </providers>
</roleManager>
The first thing to point out is that if you enable this feature, you can no longer use the WindowsBuiltInRole enumeration option with the User.IsInRole method because the underlying type for User has now become a RolePrincipal type, which cannot be converted to WindowsPrincipal. You can continue to use the User.IsInRole method that accepts a string, or you can use the Roles.IsUserInRole(string, string) method, that takes the user name and the role to check against. The only other meaningful method exposed by the WindowsTokenRoleProvider is the GetRolesForUser method which returns an array of roles:
@foreach(var role in Roles.GetRolesForUser()){
    <div>User belongs to @role</div>
}
Unless you actually need to use this method, there seems little point in activating the RoleManager for your intranet site.
