The original tutorial series, produced by Tom Dykstra and Rick Anderson ( @RickAndMSFT ) was written using the C# language. My versions keep as close to the originals as possible, changing only the coding language. The narrative text is largely unchanged from the original and is used with permission from Microsoft.
This tutorial series teaches you how to create ASP.NET MVC 5 applications using the Entity Framework 6 and Visual Studio 2013 Express for Web. This series uses the Code First workflow. For information about how to choose between Code First, Database First, and Model First, see Entity Framework Development Workflows.
The tutorial series comprises 12 sections in total. They are intended to be followed sequentially as each section builds on the knowledge imparted in the previous sections. Progress through the sections is reflected in a Visual Studio Express for Web project download that accompanies each section which features the web application that you build through the series.
Download the code
The code for this section is available here. Save the .zip file to a convenient location and then extract the contents. Make sure you have an edition of Visual Studio 2013 installed (Express for Web, Professional, Premium or Ultimate) and double click the .sln file. Once the project is opened in your IDE, press Shift+Ctrl+B to build the solution. This will ensure that all packages are restored from Nuget and may take a while depending on your Internet connection speed.
The navigation path through the series is as follows:
- Creating an Entity Framework Data Model
- Implementing Basic CRUD Functionality
- Sorting, Filtering and Paging
- Connection Resiliency and Command Interception
- Code First Migrations and Deployment
- Creating a More Complex Data Model
- Reading Related Data
- Updating Related Data
- Async and Stored Procedures
- Handling Concurrency
- Implementing-Inheritance
- Advanced Entity Framework Scenarios
Enable Code First Migrations
When you develop a new application, your data model changes frequently, and each time the model changes, it gets out of sync with the database. You have configured the Entity Framework to automatically drop and re-create the database each time you change the data model. When you add, remove, or change entity classes or change your DbContext class, the next time you run the application it automatically deletes your existing database, creates a new one that matches the model, and seeds it with test data.
This method of keeping the database in sync with the data model works well until you deploy the application to production. When the application is running in production it is usually storing data that you want to keep, and you don't want to lose everything each time you make a change such as adding a new column. The Code First Migrations feature solves this problem by enabling Code First to update the database schema instead of dropping and re-creating the database. In this tutorial, you'll deploy the application, and to prepare for that you'll enable Migrations.
-
Disable the initializer that you set up earlier by commenting out or deleting the contexts element that you added to the application Web.config file.
<entityFramework>
  <!--<contexts>
    <context type="ContosoUniversity.DAL.SchoolContext, ContosoUniversity">
      <databaseInitializer type="ContosoUniversity.DAL.SchoolInitializer, ContosoUniversity" />
    </context>
  </contexts>-->
  <defaultConnectionFactory type="System.Data.Entity.Infrastructure.LocalDbConnectionFactory, EntityFramework">
    <parameters>
      <parameter value="v11.0" />
    </parameters>
  </defaultConnectionFactory>
  <providers>
    <provider invariantName="System.Data.SqlClient" type="System.Data.Entity.SqlServer.SqlProviderServices, EntityFramework.SqlServer" />
  </providers>
</entityFramework>
-
Also in the application Web.config file, change the name of the database in the connection string to ContosoUniversity2.
<connectionStrings>
  <add name="SchoolContext" connectionString="Data Source=(LocalDb)\v11.0;Initial Catalog=ContosoUniversity2;Integrated Security=SSPI;" providerName="System.Data.SqlClient" />
</connectionStrings>
This change sets up the project so that the first migration will create a new database. This isn't required but you'll see later why it's a good idea.
-
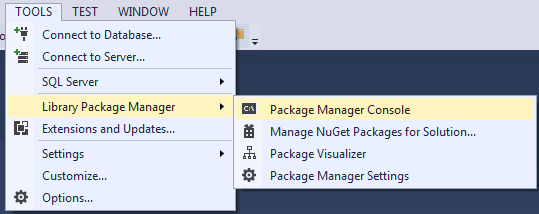
From the Tools menu, click Library Package Manager and then Package Manager Console.
-
At the PM> prompt enter the following commands:
enable-migrations
add-migration InitialCreate
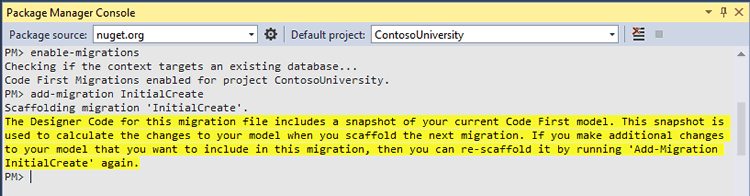
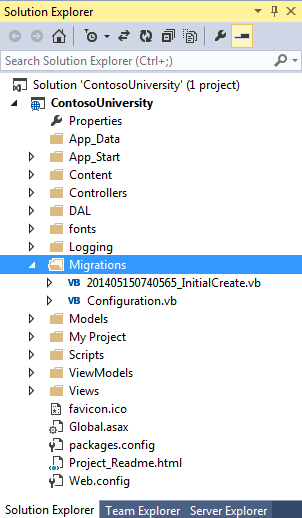
The enable-migrations command creates a Migrations folder in the ContosoUniversity project, and it puts in that folder a Configuration.vb file that you can edit to configure Migrations.
(If you missed the step above that directs you to change the database name, Migrations will find the existing database and automatically do the add-migration command. That's OK, it just means you won't run a test of the migrations code before you deploy the database. Later when you run the update-database command nothing will happen because the database will already exist.)
Like the initializer class that you saw earlier, the Configuration class includes a Seed method.
Friend NotInheritable Class Configuration
    Inherits DbMigrationsConfiguration(Of DAL.SchoolContext)

    Public Sub New()
        AutomaticMigrationsEnabled = False
    End Sub

    Protected Overrides Sub Seed(context As DAL.SchoolContext)
        '  This method will be called after migrating to the latest version.
        '  You can use the DbSet(Of T).AddOrUpdate() helper extension method
        '  to avoid creating duplicate seed data. E.g.
        '
        '    context.People.AddOrUpdate(
        '       Function(c) c.FullName,
        '       New Customer() With {.FullName = "Andrew Peters"},
        '       New Customer() With {.FullName = "Brice Lambson"},
        '       New Customer() With {.FullName = "Rowan Miller"})
    End Sub
End Class
The purpose of the Seed method is to enable you to insert or update test data after Code First creates or updates the database. The method is called when the database is created and every time the database schema is updated after a data model change.
Set up the Seed Method
When you are dropping and re-creating the database for every data model change, you use the initializer class's Seed method to insert test data, because after every model change the database is dropped and all the test data is lost. With Code First Migrations, test data is retained after database changes, so including test data in the Seed method is typically not necessary. In fact, you don't want the Seed method to insert test data if you'll be using Migrations to deploy the database to production, because the Seed method will run in production. In that case you want the Seed method to insert into the database only the data that you need in production. For example, you might want the database to include actual department names in the Department table when the application becomes available in production.
For this tutorial, you'll be using Migrations for deployment, but your Seed method will insert test data anyway in order to make it easier to see how application functionality works without having to manually insert a lot of data.
Replace the contents of the Configuration.vb file with the following code, which will load test data into the new database.
Imports System
Imports System.Data.Entity
Imports System.Data.Entity.Migrations
Imports System.Linq
Imports ContosoUniversity.DAL
Imports ContosoUniversity.Models

Namespace Migrations

    Friend NotInheritable Class Configuration
        Inherits DbMigrationsConfiguration(Of SchoolContext)

        Public Sub New()
            AutomaticMigrationsEnabled = False
        End Sub

        Protected Overrides Sub Seed(context As SchoolContext)
            Dim students = New List(Of Student)() From {
                New Student() With {
                    .FirstMidName = "Carson",
                    .LastName = "Alexander",
                    .EnrollmentDate = DateTime.Parse("2010-09-01")
                },
                New Student() With {
                    .FirstMidName = "Meredith",
                    .LastName = "Alonso",
                    .EnrollmentDate = DateTime.Parse("2012-09-01")
                },
                New Student() With {
                    .FirstMidName = "Arturo",
                    .LastName = "Anand",
                    .EnrollmentDate = DateTime.Parse("2013-09-01")
                },
                New Student() With {
                    .FirstMidName = "Gytis",
                    .LastName = "Barzdukas",
                    .EnrollmentDate = DateTime.Parse("2012-09-01")
                },
                New Student() With {
                    .FirstMidName = "Yan",
                    .LastName = "Li",
                    .EnrollmentDate = DateTime.Parse("2012-09-01")
                },
                New Student() With {
                    .FirstMidName = "Peggy",
                    .LastName = "Justice",
                    .EnrollmentDate = DateTime.Parse("2011-09-01")
                },
                New Student() With {
                    .FirstMidName = "Laura",
                    .LastName = "Norman",
                    .EnrollmentDate = DateTime.Parse("2013-09-01")
                },
                New Student() With {
                    .FirstMidName = "Nino",
                    .LastName = "Olivetto",
                    .EnrollmentDate = DateTime.Parse("2005-08-11")
                }
            }
            For Each s In students
                context.Students.AddOrUpdate(Function(p) p.LastName, s)
            Next

            context.SaveChanges()

            Dim courses = New List(Of Course)() From {
                New Course() With {
                    .CourseID = 1050,
                    .Title = "Chemistry",
                    .Credits = 3
                },
                New Course() With {
                    .CourseID = 4022,
                    .Title = "Microeconomics",
                    .Credits = 3
                },
                New Course() With {
                    .CourseID = 4041,
                    .Title = "Macroeconomics",
                    .Credits = 3
                },
                New Course() With {
                    .CourseID = 1045,
                    .Title = "Calculus",
                    .Credits = 4
                },
                New Course() With {
                    .CourseID = 3141,
                    .Title = "Trigonometry",
                    .Credits = 4
                },
                New Course() With {
                    .CourseID = 2021,
                    .Title = "Composition",
                    .Credits = 3
                },
                New Course() With {
                    .CourseID = 2042,
                    .Title = "Literature",
                    .Credits = 4
                }
            }
            For Each c In courses
                context.Courses.AddOrUpdate(Function(p) p.Title, c)
            Next
            context.SaveChanges()

            Dim enrollments = New List(Of Enrollment)() From {
                New Enrollment() With {
                    .StudentID = students.Single(Function(s) s.LastName = "Alexander").ID,
                    .CourseID = courses.Single(Function(c) c.Title = "Chemistry").CourseID,
                    .Grade = Grade.A
                },
                New Enrollment() With {
                    .StudentID = students.Single(Function(s) s.LastName = "Alexander").ID,
                    .CourseID = courses.Single(Function(c) c.Title = "Microeconomics").CourseID,
                    .Grade = Grade.C
                },
                New Enrollment() With {
                    .StudentID = students.Single(Function(s) s.LastName = "Alexander").ID,
                    .CourseID = courses.Single(Function(c) c.Title = "Macroeconomics").CourseID,
                    .Grade = Grade.B
                },
                New Enrollment() With {
                    .StudentID = students.Single(Function(s) s.LastName = "Alonso").ID,
                    .CourseID = courses.Single(Function(c) c.Title = "Calculus").CourseID,
                    .Grade = Grade.B
                },
                New Enrollment() With {
                    .StudentID = students.Single(Function(s) s.LastName = "Alonso").ID,
                    .CourseID = courses.Single(Function(c) c.Title = "Trigonometry").CourseID,
                    .Grade = Grade.B
                },
                New Enrollment() With {
                    .StudentID = students.Single(Function(s) s.LastName = "Alonso").ID,
                    .CourseID = courses.Single(Function(c) c.Title = "Composition").CourseID,
                    .Grade = Grade.B
                },
                New Enrollment() With {
                    .StudentID = students.Single(Function(s) s.LastName = "Anand").ID,
                    .CourseID = courses.Single(Function(c) c.Title = "Chemistry").CourseID
                },
                New Enrollment() With {
                    .StudentID = students.Single(Function(s) s.LastName = "Anand").ID,
                    .CourseID = courses.Single(Function(c) c.Title = "Microeconomics").CourseID,
                    .Grade = Grade.B
                },
                New Enrollment() With {
                    .StudentID = students.Single(Function(s) s.LastName = "Barzdukas").ID,
                    .CourseID = courses.Single(Function(c) c.Title = "Chemistry").CourseID,
                    .Grade = Grade.B
                },
                New Enrollment() With {
                    .StudentID = students.Single(Function(s) s.LastName = "Li").ID,
                    .CourseID = courses.Single(Function(c) c.Title = "Composition").CourseID,
                    .Grade = Grade.B
                },
                New Enrollment() With {
                    .StudentID = students.Single(Function(s) s.LastName = "Justice").ID,
                    .CourseID = courses.Single(Function(c) c.Title = "Literature").CourseID,
                    .Grade = Grade.B
                }
            }

            For Each e As Enrollment In enrollments
                Dim enrollmentInDataBase = context.Enrollments.Where(Function(s) s.Student.ID = e.StudentID AndAlso s.Course.CourseID = e.CourseID).SingleOrDefault()
                If enrollmentInDataBase Is Nothing Then
                    context.Enrollments.Add(e)
                End If
            Next
            context.SaveChanges()
        End Sub


    End Class

End Namespace
The Seed method takes the database context object as an input parameter, and the code in the method uses that object to add new entities to the database. For each entity type, the code creates a collection of new entities, adds them to the appropriate DbSet property, and then saves the changes to the database. It isn't necessary to call the SaveChanges method after each group of entities as is done here, but doing that helps you locate the source of a problem if an exception occurs while the code is writing to the database.
Some of the statements that insert data use the AddOrUpdate method to perform an "upsert" operation. Because the Seed method runs every time you execute the update-database command, typically after each migration, you can't just insert data, because the rows you are trying to add will already be there after the first migration that creates the database. The "upsert" operation prevents errors that would happen if you try to insert a row that already exists, but it overrides any changes to data that you may have made while testing the application. With test data in some tables you might not want that to happen: in some cases when you change data while testing you want your changes to remain after database updates. In that case you want to do a conditional insert operation: insert a row only if it doesn't already exist. The Seed method uses both approaches.
The first parameter passed to the AddOrUpdate method specifies the property to use to check if a row already exists. For the test student data that you are providing, the LastName property can be used for this purpose since each last name in the list is unique:
context.Students.AddOrUpdate(Function(p) p.LastName, s)
This code assumes that last names are unique. If you manually add a student with a duplicate last name, you'll get the following exception the next time you perform a migration.
Sequence contains more than one element
For information about how to handle redundant data such as two students named "Alexander Carson", see Seeding and Debugging Entity Framework (EF) DBs on Rick Anderson's blog. For more information about the AddOrUpdate method, see Take care with EF 4.3 AddOrUpdate Method on Julie Lerman's blog.
The code that creates Enrollment entities assumes you have the ID value in the entities in the students collection, although you didn't set that property in the code that creates the collection.
New Enrollment() With {
       .StudentID = students.Single(Function(s) s.LastName = "Alexander").ID,
       .CourseID = courses.Single(Function(c) c.Title = "Chemistry").CourseID,
       .Grade = Grade.A
 }
You can use the ID property here because the ID value is set when you call SaveChanges for the students collection. EF automatically gets the primary key value when it inserts an entity into the database, and it updates the ID property of the entity in memory.
The code that adds each Enrollment entity to the Enrollments entity set doesn't use the AddOrUpdate method. It checks if an entity already exists and inserts the entity if it doesn't exist. This approach will preserve changes you make to an enrollment grade by using the application UI. The code loops through each member of the Enrollment List and if the enrollment is not found in the database, it adds the enrollment to the database. The first time you update the database, the database will be empty, so it will add each enrollment.
For Each e As Enrollment In enrollments
    Dim enrollmentInDataBase = context.Enrollments.Where(Function(s) s.Student.ID = e.StudentID AndAlso s.Course.CourseID = e.CourseID).SingleOrDefault()
    If enrollmentInDataBase Is Nothing Then
        context.Enrollments.Add(e)
    End If
Next
- Build the project
Execute the First Migration
When you executed the add-migration command, Migrations generated the code that would create the database from scratch. This code is also in the Migrations folder, in the file named <timestamp>_InitialCreate.vb. The Up method of the InitialCreate class creates the database tables that correspond to the data model entity sets, and the Down method deletes them.
Namespace Migrations
    Public Partial Class InitialCreate
        Inherits DbMigration

        Public Overrides Sub Up()
            CreateTable(
                "dbo.Course",
                Function(c) New With
                    {
                        .CourseID = c.Int(nullable := False),
                        .Title = c.String(),
                        .Credits = c.Int(nullable := False)
                    }) _
                .PrimaryKey(Function(t) t.CourseID)

            CreateTable(
                "dbo.Enrollment",
                Function(c) New With
                    {
                        .EnrollmentID = c.Int(nullable := False, identity := True),
                        .CourseID = c.Int(nullable := False),
                        .StudentID = c.Int(nullable := False),
                        .Grade = c.Int()
                    }) _
                .PrimaryKey(Function(t) t.EnrollmentID) _
                .ForeignKey("dbo.Course", Function(t) t.CourseID, cascadeDelete := True) _
                .ForeignKey("dbo.Student", Function(t) t.StudentID, cascadeDelete := True) _
                .Index(Function(t) t.CourseID) _
                .Index(Function(t) t.StudentID)

            CreateTable(
                "dbo.Student",
                Function(c) New With
                    {
                        .ID = c.Int(nullable := False, identity := True),
                        .LastName = c.String(),
                        .FirstMidName = c.String(),
                        .EnrollmentDate = c.DateTime(nullable := False)
                    }) _
                .PrimaryKey(Function(t) t.ID)

        End Sub

        Public Overrides Sub Down()
            DropForeignKey("dbo.Enrollment", "StudentID", "dbo.Student")
            DropForeignKey("dbo.Enrollment", "CourseID", "dbo.Course")
            DropIndex("dbo.Enrollment", New String() { "StudentID" })
            DropIndex("dbo.Enrollment", New String() { "CourseID" })
            DropTable("dbo.Student")
            DropTable("dbo.Enrollment")
            DropTable("dbo.Course")
        End Sub
    End Class
End Namespace
Migrations calls the Up method to implement the data model changes for a migration. When you enter a command to roll back the update, Migrations calls the Down method.
This is the initial migration that was created when you entered the add-migration InitialCreate command. The parameter (InitialCreate in the example) is used for the file name and can be whatever you want; you typically choose a word or phrase that summarizes what is being done in the migration. For example, you might name a later migration "AddDepartmentTable".
If you created the initial migration when the database already exists, the database creation code is generated but it doesn't have to run because the database already matches the data model. When you deploy the app to another environment where the database doesn't exist yet, this code will run to create your database, so it's a good idea to test it first. That's why you changed the name of the database in the connection string earlier - so that migrations can create a new one from scratch.
-
In the Package Manager Console window, enter the following command:
update-database
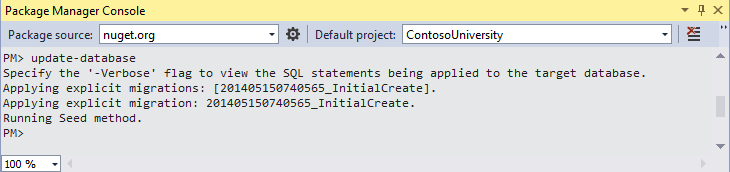
The update-database command runs the Up method to create the database and then it runs the Seed method to populate the database. The same process will run automatically in production after you deploy the application, as you'll see in the following section.
-
Use Server Explorer to inspect the database as you did in the first tutorial, and run the application to verify that everything still works the same as before.
Deploy to Windows Azure
So far the application has been running locally in IIS Express on your development computer. To make it available for other people to use over the Internet, you have to deploy it to a web hosting provider. In this section of the tutorial you'll deploy it to a Windows Azure Web Site. This section is optional; you can skip this and continue with the following tutorial, or you can adapt the instructions in this section for a different hosting provider of your choice.
Note: I don't have an Azure account and have not followed the steps described in the next section. I have included this verbatim from the original tutorial for completeness. If you have any questions about the process of signing up for an Azure account or deployment to Azure, you should seek further assistance at the MSDN Azure forum or Stackoverflow, where you should tag your question with "Azure".
Using Code First Migrations to Deploy the Database
To deploy the database you'll use Code First Migrations. When you create the publish profile that you use to configure settings for deploying from Visual Studio, you'll select a check box labeled Execute Code First Migrations (runs on application start). This setting causes the deployment process to automatically configure the application Web.config file on the destination server so that Code First uses the MigrateDatabaseToLatestVersion initializer class.
Visual Studio doesn't do anything with the database during the deployment process while it is copying your project to the destination server. When you run the deployed application and it accesses the database for the first time after deployment, Code First checks if the database matches the data model. If there's a mismatch, Code First automatically creates the database (if it doesn't exist yet) or updates the database schema to the latest version (if a database exists but doesn't match the model). If the application implements a Migrations Seed method, the method runs after the database is created or the schema is updated.
Your Migrations Seed method inserts test data. If you were deploying to a production environment, you would have to change the Seed method so that it only inserts data that you want to be inserted into your production database. For example, in your current data model you might want to have real courses but fictional students in the development database. You can write a Seed method to load both in development, and then comment out the fictional students before you deploy to production. Or you can write a Seed method to load only courses, and enter the fictional students in the test database manually by using the application's UI.
Get a Windows Azure account
You'll need a Windows Azure account. If you don't already have one, but you do have an MSDN subscription, you can activate your MSDN subscription benefits. Otherwise, you can create a free trial account in just a couple of minutes. For details, see Windows Azure Free Trial.
Create a web site and a SQL database in Windows Azure
Your Windows Azure Web Site will run in a shared hosting environment, which means it runs on virtual machines (VMs) that are shared with other Windows Azure clients. A shared hosting environment is a low-cost way to get started in the cloud. Later, if your web traffic increases, the application can scale to meet the need by running on dedicated VMs.
You'll deploy the database to Windows Azure SQL Database. SQL Database is a cloud-based relational database service that is built on SQL Server technologies. Tools and applications that work with SQL Server also work with SQL Database.
- In the Windows Azure Management Portal, click Web Sites in the left tab, and then click New.

- Click CUSTOM CREATE.
The New Web Site - Custom Create wizard opens.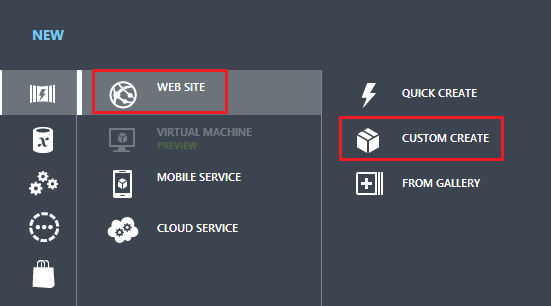
- In the New Web Site step of the wizard, enter a string in the URL box to use as the unique URL for your application. The complete URL will consist of what you enter here plus the suffix that you see next to the text box. The illustration shows "ConU", but that URL is probably taken so you will have to choose a different one.

- In the Region drop-down list, choose a region close to you. This setting specifies which data center your web site will run in.
- In the Database drop-down list, choose Create a free 20 MB SQL database.

- In the DB CONNECTION STRING NAME, enter SchoolContext.

- Click the arrow that points to the right at the bottom of the box. The wizard advances to the Database Settings step.
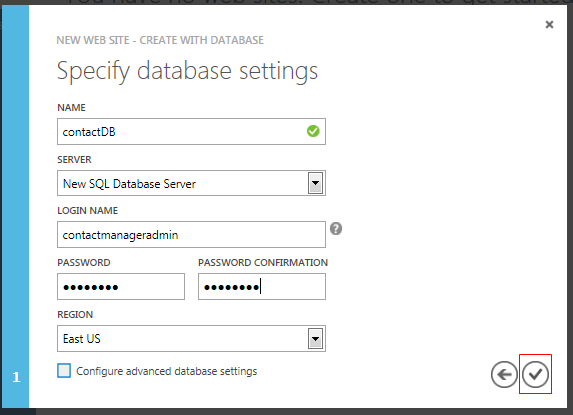
- In the Name box, enter ContosoUniversityDB.
- In the Server box, select New SQL Database server. Alternatively, if you previously created a server, you can select that server from the drop-down list.
- Enter an administrator LOGIN NAME and PASSWORD. If you selected New SQL Database server you aren't entering an existing name and password here, you're entering a new name and password that you're defining now to use later when you access the database. If you selected a server that you created previously, you’ll enter credentials for that server. For this tutorial, you won't select the Advanced check box. The Advanced options enable you to set the database collation.
- Choose the same Region that you chose for the web site.
- Click the check mark at the bottom right of the box to indicate that you're finished.
The Management Portal returns to the Web Sites page, and the Status column shows that the site is being created. After a while (typically less than a minute), the Status column shows that the site was successfully created. In the navigation bar at the left, the number of sites you have in your account appears next to theWeb Sites icon, and the number of databases appears next to the SQL Databases icon.
Deploy the application to Windows Azure
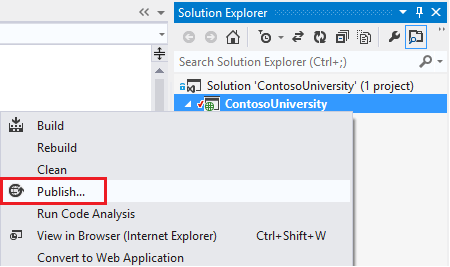
- In Visual Studio, right-click the project in Solution Explorer and select Publish from the context menu.
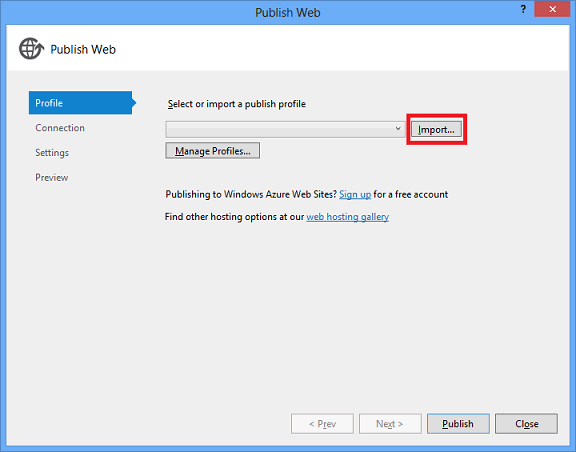
- In the Profile tab of the Publish Web wizard, click Import.
-
If you have not previously added your Windows Azure subscription in Visual Studio, perform the following steps. These steps enable Visual Studio to connect to your Windows Azure subscription so that the drop-down list under Import from a Windows Azure web site will include your web site.
As an alternative, you can sign in directly to your Windows Azure account without downloading a subscription file. To use this method, click Sign In instead of Manage subscriptions in the next step. This alternative is simpler, but as this tutorial was originally being written in November, 2013, only the subscription file download enabled Server Explorer to connect to Windows Azure SQL Database.
a. In the Import Publish Profile dialog box, click Manage subscriptions.
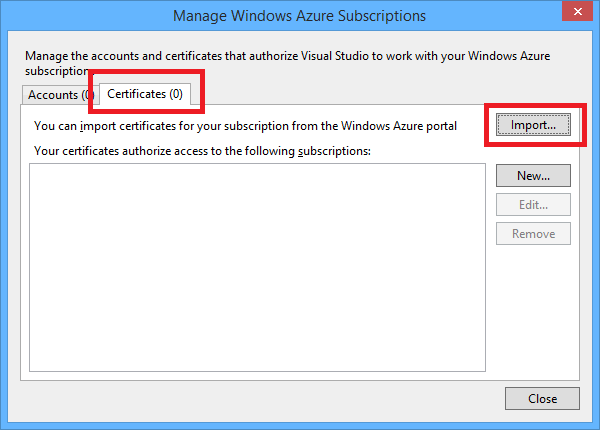
b. In the Manage Windows Azure Subscriptions dialog box, click the Certificates tab, and then click Import.
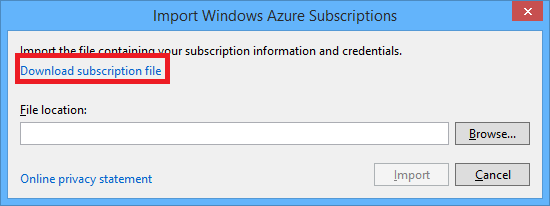
c. In the Import Windows Azure Subscriptions dialog box, click Download subscription file .
d. In your browser window, save the .publishsettings file.
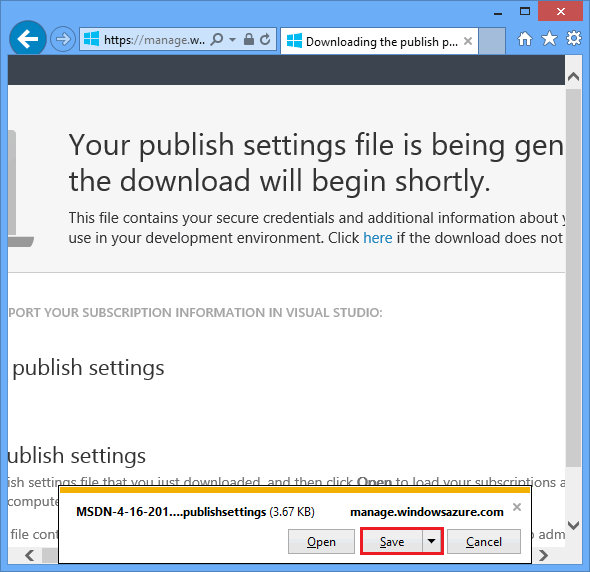
Security Note: The publishsettings file contains your credentials (unencoded) that are used to administer your Windows Azure subscriptions and services. The security best practice for this file is to store it temporarily outside your source directories (for example in the Downloads folder), and then delete it once the import has completed. A malicious user who gains access to the .publishsettings file can edit, create, and delete your Windows Azure services.
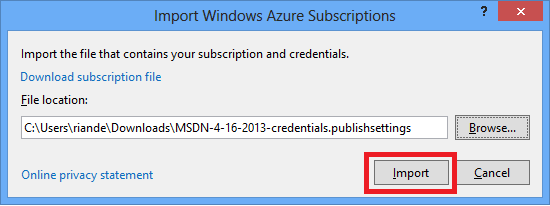
e. In the Import Windows Azure Subscriptions dialog box, click Browse and navigate to the .publishsettingsfile.
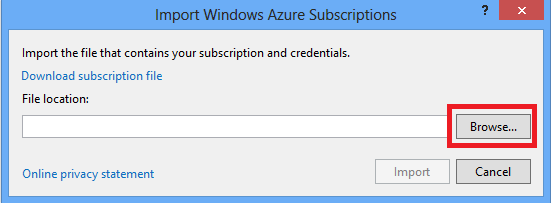
f. Click Import.
-
Close the Manage Windows Azure Subscriptions box.
-
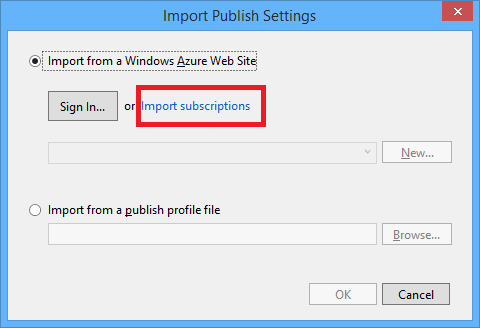
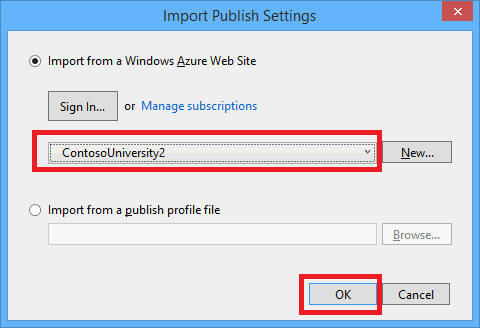
In the Import Publish Profile dialog box, select Import from a Windows Azure web site, select your web site from the drop-down list, and then click OK.
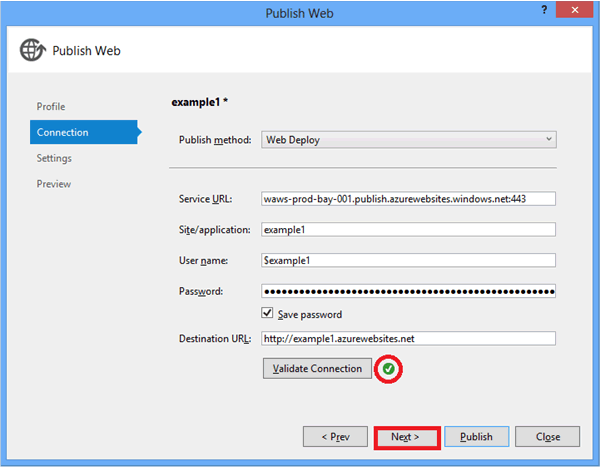
- In the Connection tab, click Validate Connection to make sure that the settings are correct.
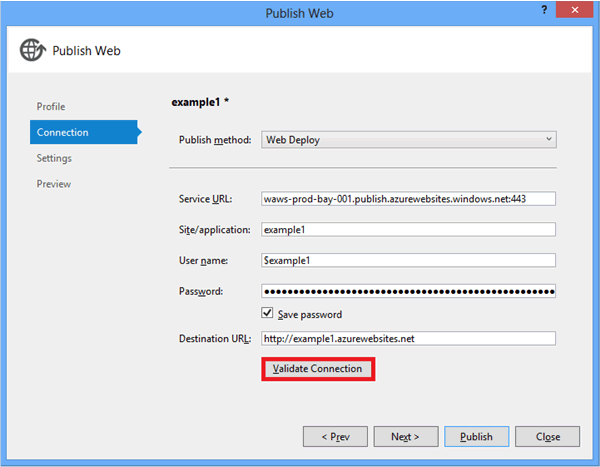
- When the connection has been validated, a green check mark is shown next to the Validate Connection button. Click Next.
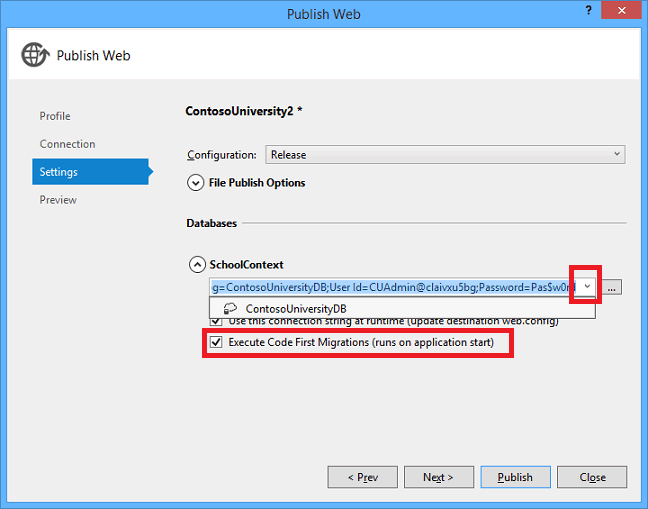
- Open the Remote connection string drop-down list under SchoolContext and select the connection string for the database you created.
- Select Execute Code First Migrations (runs on application start).
- Click Next.
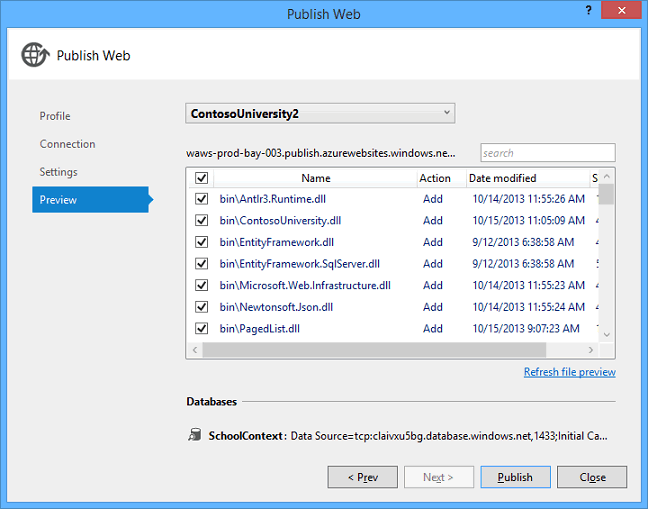
- In the Preview tab, click Start Preview.
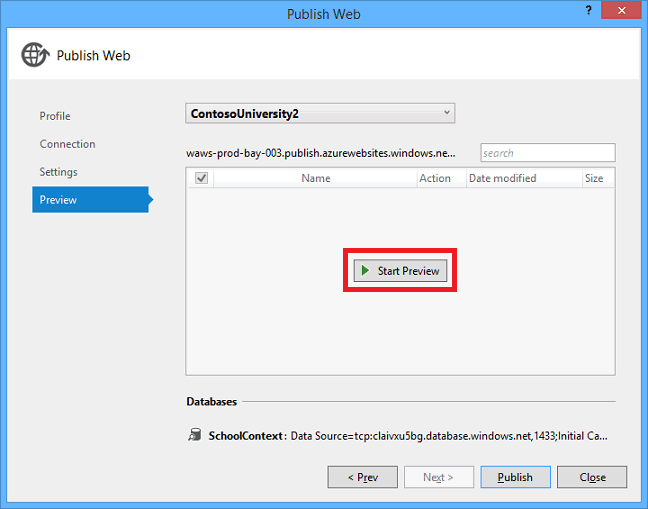
The tab displays a list of the files that will be copied to the server. Displaying the preview isn't required to publish the application but is a useful function to be aware of. In this case, you don't need to do anything with the list of files that is displayed. The next time you deploy this application, only the files that have changed will be in this list.
- Click Publish.
Visual Studio begins the process of copying the files to the Windows Azure server. - The Output window shows what deployment actions were taken and reports successful completion of the deployment.
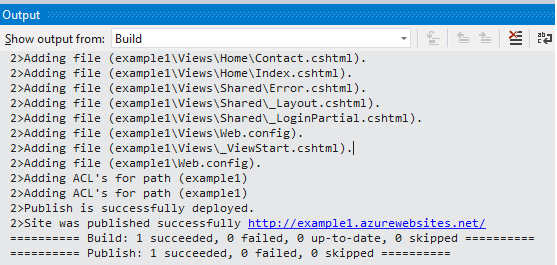
- Upon successful deployment, the default browser automatically opens to the URL of the deployed web site.
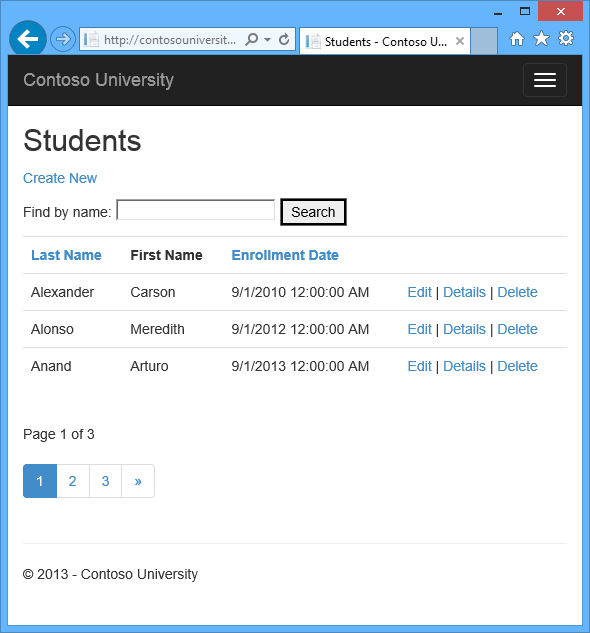
The application you created is now running in the cloud. Click the Students tab.
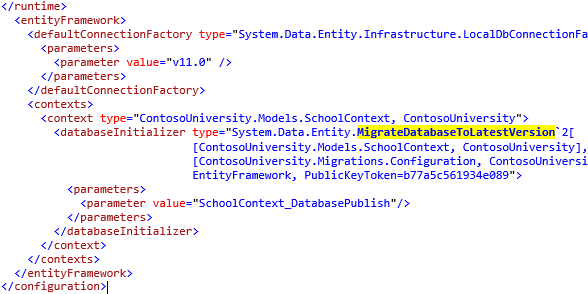
This setting causes the deployment process to automatically configure the application Web.config file on the destination server so that Code First uses the MigrateDatabaseToLatestVersion initializer class.
At this point your SchoolContext database has been created in the Windows Azure SQL Database because you selected Execute Code First Migrations (runs on app start). The Web.config file in the deployed web site has been changed so that the MigrateDatabaseToLatestVersion initializer runs the first time your code reads or writes data in the database (which happened when you selected the Students tab):
The deployment process also created a new connection string (SchoolContext_DatabasePublish) for Code First Migrations to use for updating the database schema and seeding the database.

You can find the deployed version of the Web.config file on your own computer inContosoUniversity\obj\Release\Package\PackageTmp\Web.config. You can access the deployed Web.config file itself by using FTP. For instructions, see ASP.NET Web Deployment using Visual Studio: Deploying a Code Update. Follow the instructions that start with "To use an FTP tool, you need three things: the FTP URL, the user name, and the password."
Advanced Migrations Scenarios
If you deploy a database by running migrations automatically as shown in this tutorial, and you are deploying to a web site that runs on multiple servers, you could get mutiple servers trying to run migrations at the same time. Migrations are atomic, so if two servers try to run the same migration, one will succeed and the other will fail (assuming the operations can't be done twice). In that scenario if you want to avoid those issues, you can call migrations manually and set up your own code so that it only happens once. For more information, see Running and Scripting Migrations from Code on Rowan Miller's blog and Migrate.exe (for executing migrations from the command line) on MSDN.
For information about other migrations scenarios, see Migrations Screencast Series.
Code First Initializers
In the deployment section you saw the MigrateDatabaseToLatestVersion initializer being used. Code First also provides other initializers, including CreateDatabaseIfNotExists (the default), DropCreateDatabaseIfModelChanges(which you used earlier) and DropCreateDatabaseAlways. The DropCreateAlways initializer can be useful for setting up conditions for unit tests. You can also write your own initializers, and you can call an initializer explicitly if you don't want to wait until the application reads from or writes to the database. At the time this tutorial is being written in November, 2013, you can only use the Create and DropCreate initializers before you enable migrations. The Entity Framework team is working on making these initializers usable with migrations as well.
For more information about initializers, see Understanding Database Initializers in Entity Framework Code First and chapter 6 of the book Programming Entity Framework: Code First by Julie Lerman and Rowan Miller.
Summary
In this tutorial you've seen how to enable migrations and deploy the application. In the next tutorial you'll begin looking at more advanced topics by expanding the data model.
