Create PDFs in ASP.NET - getting started with iTextSharp
iTextSharp - Working with Fonts
iTextSharp - Adding Text with Chunks, Phrases and Paragraphs
Lists with iTextSharp
Links
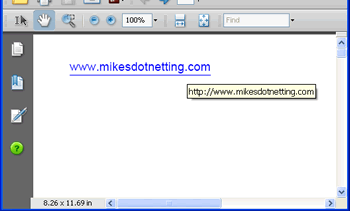
iTextSharp Anchor objects are very similar to their HTML counterparts, in that they permit you to create hyperlinks both externally from the document, and internally within the document. Where they diverge from the HTML <a> element is that by default, they do not adopt any special styling within a PDF. For that reason, I suggest applying underlining and a blue colour to the font, as this should help users identify an Anchor as providing some functionality:
string path = Server.MapPath("PDFs");
Document doc = new Document();
try
{
PdfWriter.GetInstance(doc, new FileStream(path + "/Anchors.pdf", FileMode.Create));
doc.Open();
Font link = FontFactory.GetFont("Arial", 12, Font.UNDERLINE, new Color(0, 0, 255));
Anchor anchor = new Anchor("www.mikesdotnetting.com", link);
anchor.Reference = "http://www.mikesdotnetting.com";
doc.Add(anchor);
}
catch (DocumentException dex)
{
Response.Write(dex.Message);
}
catch (IOException ioex)
{
Response.Write(ioex.Message);
}
finally
{
doc.Close();
}
The code sample above creates an external link, which when clicked will open a browser at this site.

Internal links within an HTML document are specified by adding a NAME attribute to an <a> tag. iTextSharp adopts the same model:
Anchor click = new Anchor("Click to go to Target");
click.Reference = "#target";
Paragraph p1 = new Paragraph();
p1.Add(click);
doc.Add(p1);
Paragraph p2 = new Paragraph();
p2.Add(new Chunk("\n\n\n\n\n\n\n\n"));
doc.Add(p2);
Anchor target = new Anchor("This is the Target");
target.Name = "target";
Paragraph p3 = new Paragraph();
p3.Add(target);
doc.Add(p3);
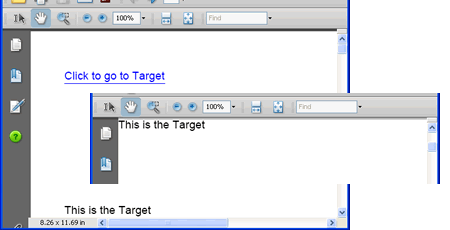
The first paragraph contains the text "Click to go to Target", and its reference is set to "#target", just as with the HTML version. The second paragraph adds some empty lines and the final paragraph contains a new Anchor, with a Name attribute set to match the Reference value in the Anchor in the first paragraph. The result is that if you click on the "Click to go to the Target" text, the PDF will immediately reposition itself so that "This is the Target" will be at the top of whatever PDF viewer you are using.

An alternative to using Anchors to set internal bookmark targets is to use the SetLocalGoto(), and SetLocalDestination() methods of the Chunk class.
Paragraph p4 = new Paragraph();
p4.Add(new Chunk("Click "));
p4.Add(new Chunk("here", link).SetLocalGoto("GOTO"));
p4.Add(new Chunk(" to find local goto"));
p4.Add(new Chunk("\n\n\n\n\n\n\n\n\n"));
Paragraph p5 = new Paragraph();
p5.Add(new Chunk("Local Goto Destination").SetLocalDestination("GOTO"));
doc.Add(p4);
doc.Add(p5);
The first chunk is added using the font that's set up to convey to users that the text should act as a hyperlink. The Chunk.SetLocalGoto() method accepts a string, which acts a a label for the target. A number of empty lines are added followed by another chunk. This one has its SetLocalDestination() method invoked, again with a string defining the location of the target. It's matches the one set in the SetLocalGoto() method earlier. When rendered to the PDF, the word "here" is underlined and in blue, and clicking on it brings "Local Goto Destination" to the top of the screen.
Bookmarks
Often when you open a PDF file, your PDF Viewer application displays a tree-view of the structure of the document, with each branch or leaf acting as a link to the corresponding chapter or section. iTextSharp provides the functionality to generate this tree-view through its Chapter and Section classes.
The top-level object is a Chapter, which will always begin on a new page. Sections cannot be added alone, but must be added to Chapter objects, or parent Section objects:
Chapter chapter1 = new Chapter(new Paragraph("This is Chapter 1"),1);
Section section1 = chapter1.AddSection(20f, "Section 1.1", 2);
Section section2 = chapter1.AddSection(20f, "Section 1.2", 2);
Section subsection1 = section2.AddSection(20f, "Subsection 1.2.1", 3);
Section subsection2 = section2.AddSection(20f, "Subsection 1.2.2", 3);
Section subsubsection = subsection2.AddSection(20f, "Sub Subsection 1.2.2.1", 4);
Chapter chapter2 = new Chapter(new Paragraph("This is Chapter 2"), 1);
Section section3 = chapter2.AddSection("Section 2.1", 2);
Section subsection3 = section3.AddSection("Subsection 2.1.1", 3);
Section section4 = chapter2.AddSection("Section 2.2", 2);
chapter1.BookmarkTitle = "Changed Title";
chapter1.BookmarkOpen = true;
chapter2.BookmarkOpen = false;
doc.Add(chapter1);
doc.Add(chapter2);

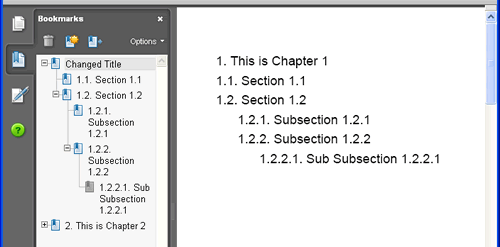
The image above helps to explain the preceding code. Initially, a Chapter object is created with a Paragraph passed in as the first argument. The second argument is the number of the Chapter - in this case 1. Nest, a Section object is added to the Chapter, with 3 arguments: a float specifying the left indentation in points; the title of the Section to appear on the page and in the Bookmarks; and the indentation depth for the entry in the Bookmarks tree. In this case, Section 1.1 is set to appear as a second-level entry on the tree. Subsection1 is added to Section 2 and has been told to appear as a third-level entry in the tree. The rest of the code that adds Chapters and Sections should be straightforward.
The final lines of code show that the actual entry in the Bookmarks can be changed from the title on the page by setting the BookMarkTitle property to another string value. Then the outline view for the tree is set as open for Chapter 1, but closed for Chapter 2. Finally, both Chapters are added to the document.
Chapters and Sections are pretty memory hungry, so they should be used judiciously. If you need to create a document such as a manual on a regular basis, this might be a task best scheduled for quieter times on your web server.
