Just to recap, JCrop is a jQuery plugin which allows users to select an area of an image to keep. It doesn't actually perform any cropping itself. That task is performed by server-side code. The simple example which follows will provide a means by which a user can upload an image file, select the area to retain after cropping, and then display the resulting cropped image. There are a couple of things required to get this to work. Obviously the latest jQuery file is needed along with the JCrop file. When you download the JCrop zip, you'll get a few folders in there. One of those is called "css". Once you have created a site within WebMatrix (choose the Empty Site template) copy the css file from there into whichever site folder you like to use for these types of file. You also need to copy the JCrop.gif image file into whichever folder you plan to use for site images. Once you've done that, open the jquery.Jcrop.css file and amend the URL on line 8 to point to the location of your JCrop.gif.
The next thing you need is the FileUpload helper. In Beta 2, that has been moved out of the core Web Pages assemblies into the microsoft helpers package available from the Package download manager. Add a file called Default.cshtml and run that in a browser. Then change the URL in the browser address bar to point to _Admin and hit Enter. You'll get the login screen for the Package Administration tool:

Enter a password that you won't forget and is not easy to guess, and then choose to install the microsoft-web-helpers 1.0 package. If all goes to plan, you should see confirmation that the package has been installed:

Create a folder and call it "Shared". This is where the Layout page will go with the following code:
<!DOCTYPE html>
<html lang="en">
    <head>
        <meta charset="utf-8" />
        <title>JCrop Sample</title>
        <script src="@Href("~/Scripts/jquery-1.4.2.min.js")" type="text/javascript"></script>
        <script src="@Href("~/Scripts/jquery.Jcrop.min.js")" type="text/javascript"></script>
        <link rel="stylesheet" href="@Href("~/Styles/StyleSheet.css")" type="text/css" />
        <link rel="stylesheet" href="@Href("~/Styles/jquery.Jcrop.css")" type="text/css" />

    </head>
    <body>
        <h1>JCrop Example</h1>
        @RenderBody()
    </body>
</html>
Next, clear out all the mark up within the Default.cshtml file you created earlier and replace it with this to start with:
@{
    Layout = "/Shared/Layout.cshtml";
    if(Request["action"].IsEmpty() && Request.Files.Count == 0){
        @RenderPage("~/Upload.cshtml");
    }

}
The code above points to a non-existant file called Upload.cshtml. This needs to be created:
<p>Upload your image</p>
@FileUpload.GetHtml(
    allowMoreFilesToBeAdded: false
)
The previous code in Default.cshtml checks to see if there are any files uploaded, or if a button called "action" has been clicked (more of that later) and if neither of these things have happened, the file upload is shown to the user in Upload.cshtml. Once the user has chosen an image to upload, the page is posted back to the server. At that point, Request.Files.Count will no longer equal 1, so the code in Default.cshtml needs extending to take account of this condition:
    if(Request.Files.Count > 0){
        var image = WebImage.GetImageFromRequest();
        if(image != null){
            var imagePath = @"Uploads/" + Path.GetFileName(image.FileName);
            image.Save(@"~/" + imagePath);
            Page.Image = imagePath;
            Page.Height = image.Height;
            Page.Width = image.Width;
        }
        @RenderPage("~/Crop.cshtml");
    }
Here we can see the Image helper at work. The GetImageFromRequest() method makes getting the image file from the Request.Form collection very easy. From there. the code sets a file path to save the image to, grabs its height and width and passes those together with the file name to Crop.cshtml:
@{
    var top = Convert.ToInt32(Page.Height*0.1);
    var left = Convert.ToInt32(Page.Width*0.1);
    var right = Convert.ToInt32(Page.Width*0.9);
    var bottom = Convert.ToInt32(Page.Height*0.9);
}
<img id="crop" src="@Page.Image" />
<form action="/" method="post">
    <input type="hidden" id="top" name="top" value="@top" />
    <input type="hidden" id="left" name="left" value="@left" />
    <input type="hidden" id="bottom" name="bottom" value="@bottom" />
    <input type="hidden" id="right" name="right" value="@right" />
    <input type="hidden" id="image" name="image" value="@Page.Image" />
    <input type="submit" name="action" value="Crop" />
</form>
<script type="text/javascript">
  $(function() {
    jQuery('#crop').Jcrop({
      onSelect: storeCoords,
      setSelect: [@top,@left,@right,@bottom]
    });
  });

  function storeCoords(c) {
    $('#top').val(c.y);
    $('#left').val(c.x);
    $('#bottom').val(c.y2);
    $('#right').val(c.x2);
  };
</script>
The job of this page is to display the uploaded image with the cropper so that the user can select which are of the image to keep after it has been cropped. Using one of the sample images that comes with the JCrop download, it should look something like this:
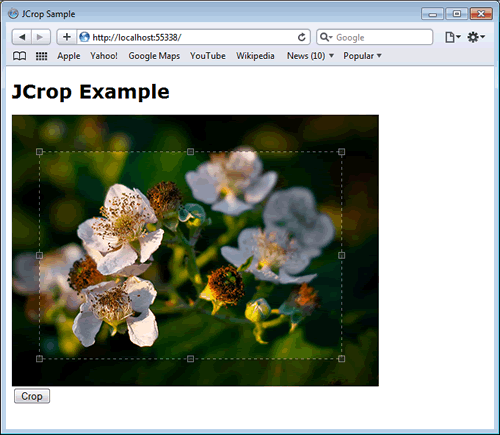
If you don't get the dotted border around the pre-selected area, check your jQuery.JCrop.css file to make sure that the URL to JCrop.gif points to the correct location. You can examine the samples in the download that accompany this article. The first part of the code - the Razor section at the top - takes the height and width of the image as provided by the previous file, and uses then to calculate an area for pre-selection. These values are passed to the setSelect option to set the selected area. The positions for the cropper are also used as defaults for the hidden fields so that if the user is happy with the selected area and does not alter the cropper, the values are passed over to the next page. Otherwise, if the user adjusts the cropped area, the onSelect event handler is fired, and the hidden field values are updated to reflect the new selected area. The image file name is also included as a hidden field so that the correct image can be referenced when the Crop button is clicked and the form submitted back to the server. Two other values are available in the storeCoords function. They are c.w and c.h, which are the width and height of the selected area. They are not used in this example.
Youll notice that the submit button has been called action. If it is clicked, the first condition in the Default.cshtml is not true, and since there is no file being posted back, the second condition is not true either. That means a third condition needs to be managed, which takes care of the cropping of the image, This gets added to Default.cshtml:
    if(Request["action"] == "Crop"){
        WebImage image = new WebImage(@"~/" + Request["image"]);
        var height = image.Height;
        var width = image.Width;
        var top = Request["top"].AsInt();
        var left = Request["left"].AsInt();
        var bottom = Request["bottom"].AsInt();
        var right = Request["right"].AsInt();
        image.Crop(top, left, height - bottom, width - right);
        var newFileName = Guid.NewGuid().ToString() + "_" +
                Path.GetFileName(image.FileName);
        Page.Image = "Uploads/" + newFileName;
        image.Save(@"~/" + Page.Image);
        @RenderPage("~/Cropped.cshtml");
    }
Again, the WebImage helper is used, this time to load the image from the file system. The various coordinates are used in conjunction with the width and height of the original image to calculate the resulting size of the cropped image, and the location that cropping should take place. These are passed in to another WebImage method - Crop() to perform the actual cropping. The cropped version is saved with a new file name, so that the original is still intact. The result is then rendered in Cropped.cshtml:
<p>Your image has been cropped</p>
<img id="crop" src="@Page.Image" />
If you check the code that managed the actual cropping in my original article, you can see that the WebImage.Crop method simplifies things drastically. The only thing I found a little confusing about the Crop() method was the values it expects. The parameters are called top, left, bottom, right. That kind of suggests that the x, y, x2 and y2 values that come from JCrop on their own would have been enough. However, further investigation shows that the bottom and right values are calculated in a bit of an odd fashion. For example the width of the new image is calculated by taking the left and right values, and subtracting the sum of those from the original width. The same goes for the height. In other words, the Crop method deducts the bits you don't want from the original, and computes the remainder, rather than the calculating the distance between points in the bit you do want to keep.
