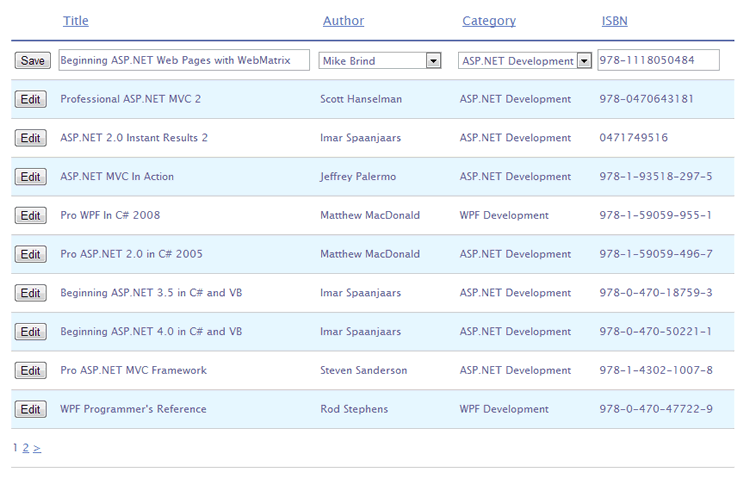
I have already looked at one approach to editing with the WebGrid, which involved invoking a jQuery dialog that contained a form. The approach covered in this article differs in that each row of data is presented as read-only, but converted to an editable format within the WebGrid so that the user doesn't have to leave the WebGrid to make their alterations:

The key to this approach is to populate the grid with both readonly and editable versions of the data, then to use the jQuery toggle command to swap between the two presentations on a line-by-line basis. So I need data prepared for dropdown lists when the page first loads as well as data to be displayed in read-only mode:
@{
    var db = Database.Open("Books");

    var books = db.Query(@"SELECT b.BookId, b.Title, b.ISBN, b.AuthorId, b.CategoryId,
                            a.FirstName + ' ' + a.LastName AS AuthorName, c.Category
                            FROM Books b INNER JOIN Authors a
                            ON b.AuthorId = a.AuthorId
                            INNER JOIN Categories c
                            ON b.CategoryId = c.CategoryId
                            ORDER BY b.BookId DESC");

    var categories = db.Query("SELECT CategoryId, Category FROM Categories")
                        .Select(category => new SelectListItem {
                            Value = category.CategoryId.ToString(),
                            Text = category.Category
                         });

    var authors = db.Query("SELECT AuthorId, FirstName + ' ' + LastName AS AuthorName FROM Authors")
                        .Select(author => new SelectListItem {
                            Value = author.AuthorId.ToString(),
                            Text = author.AuthorName
                         });

    var grid = new WebGrid(books);
}
The code gets three sets of data - the books details that I want to display, the collection of categories that the books can belong to and the authors that the books have been written by. The last two sets of data are converted to Enumerable<SlectListItem>. This is so that they can be plugged directly into Html.DropDownList helpers. Finally, the books data is passed into a WebGrid. Here is the code for the grid:
@grid.GetHtml(
    tableStyle : "table",
    alternatingRowStyle : "alternate",
    selectedRowStyle: "selected",
    headerStyle : "header",
    columns : grid.Columns(
        grid.Column("",
                    style: "col1",
                    format: @<text>
                                <button class="edit-book display-mode" id="@item.BookId">Edit</button>
                                <button class="save-book edit-mode" id="@item.BookId">Save</button>
                            </text>),
        grid.Column("Title",
                    style: "col2",
                    format: @<text>
                                <span id="title" class="display-mode">@item.Title</span>
                                @Html.TextBox("Title", item.Title, new {@class="edit-mode", size = 45})
                            </text>),
        grid.Column("AuthorName",
                    header : "Author",
                    style: "col3",
                    format: @<text>
                                <span id="authorname" class="display-mode">@item.AuthorName</span>
                                @Html.DropDownList("AuthorId", null, authors, item.AuthorId, new {@class="edit-mode"})
                            </text>),
        grid.Column("Category",
                    style: "col4",
                    format: @<text>
                                <span id="category" class="display-mode">@item.Category</span>
                                @Html.DropDownList("CategoryId", null, categories, item.CategoryId, new {@class="edit-mode"})
                            </text>),
        grid.Column("ISBN",
                    style: "col5",
                    format: @<text>
                                <span id="isbn" class="display-mode">@item.ISBN</span>
                                @Html.TextBox("ISBN", item.ISBN, new {@class="edit-mode", size = 20})
                            </text>)
     )
)
The main thing to take note of is that there are two items in each of the cells. In most of them, there is a span that holds the item for display, and a form element for editing the item. As I mentioned earlier, I am using the Html form helpers mainly because they require a lot less code than HTML itself. All items designed for display are given the CSS class "display-mode". The form fields have the CSS class of "edit-mode" applied to them. Both of the buttons in the first column are given two CSS classes.
The next part of the jigsaw is the jQuery code that manages switching between the two modes:
<script>
    $(function () {
        $('.edit-mode').hide();
        $('.edit-book').on('click', function () {
            var tr = $(this).parents('tr:first');
            tr.find('.edit-mode, .display-mode').toggle();
        });
        $('.save-book').on('click', function () {
            var tr = $(this).parents('tr:first');
            var bookId = $(this).prop('id');
            var title = tr.find('#Title').val();
            var authorId = tr.find('#AuthorId').val();
            var categoryId = tr.find('#CategoryId').val();
            var isbn = tr.find('#ISBN').val();
            $.post(
                '/EditBook',
                { BookId: bookId, Title: title, AuthorId: authorId, CategoryId: categoryId, ISBN: isbn },
                function (book) {
                    tr.find('#title').text(book.Title);
                    tr.find('#authorname').text(book.AuthorName);
                    tr.find('#category').text(book.Category);
                    tr.find('#isbn').text(book.ISBN);
                }, "json");
            tr.find('.edit-mode, .display-mode').toggle();
        });
    })
</script>
The first thing this script does is to hide all items with a CSS class of edit-mode resulting in all of the form fields and the Save button being hidden. An event handler is hooked up to the click event of the Edit button. This gets a reference to the table row that the button is in, and then toggles the visibility of all items within it that have a CSS class of edit-mode and display-mode. Since all edit-mode items were hidden at the outset, they now become visible, and all display items are hidden.
The next section of jQuery code applies an event handler to the click event of the Save button. Like the previous event handler, it obtains a reference the the current row, and then obtains values from the form fields and dropdowns as well as the ID of the current item from the Save button itself (which has been applied to its id attribute). It then packages these values and posts them to a page called EditBook.cshtml. Notice the absence of <form> tags in the code; jQuery takes care of constructing the POST request. Then it takes the data that the EditBook page returns and uses that to update the spans containing the displayed data. Finally, the edit-mode and display-mode items in the current row have their visibility toggled once again.
Here is the code for the EditBook.cshtml file:
@{
    var bookId = Request["BookId"];
    var title = Request["Title"];
    var authorId = Request["AuthorId"];
    var categoryId = Request["CategoryId"];
    var isbn = Request["ISBN"];
    var db = Database.Open("Books");
    var sql = "UPDATE Books SET Title = @0, AuthorId = @1, CategoryId = @2, ISBN = @3 WHERE BookId = @4";
    db.Execute(sql, title, authorId, categoryId, isbn, bookId);
    sql = @"SELECT b.Title, b.ISBN,  a.FirstName + ' ' + a.LastName AS AuthorName, c.Category
            FROM Books b INNER JOIN Authors a ON b.AuthorId = a.AuthorId
            INNER JOIN Categories c ON b.CategoryId = c.CategoryId
            WHERE BookId = @0";
    var result = db.QuerySingle(sql, bookId);
    Json.Write(result, Response.Output);
}
It takes the values from the Request collection, and uses them to update the database table. Then it retrieves the data back from the database suitably shaped for display. Finally, the Json helper is used to send that data back to the calling code for consumption.
The code for this article is available at GitHub.
