Create PDFs in ASP.NET - getting started with iTextSharp
iTextSharp - Working with Fonts
iTextSharp - Adding Text with Chunks, Phrases and Paragraphs
Lists with iTextSharp
iTextSharp - Links and Bookmarks
iTextSharp - Introducing Tables
iTextSharp - Working with Images
Up till now, all content added to the PDF documents in previous articles have relied on Simple iText, which takes care of positioning content within the flow of a document. It also looks after creating new pages to accept overflow text etc. Working with graphics needs a slightly different approach, in that we now need to use a PdfContentByte() object explicitly. This is obtained from the PdfWriter object's DirectContent. This also means that instead of just invoking the GetInstance method of the PdfWriter, we actually need to instantiate a PdfWriter object.
string pdfpath = Server.MapPath("PDFs");
Document doc = new Document();
try
{
PdfWriter writer = PdfWriter.GetInstance(doc, new FileStream(pdfpath + "/Graphics.pdf", FileMode.Create));
doc.Open();
PdfContentByte cb = writer.DirectContent;
...
Now that we have a working PdfContentByte object, we can use it to start drawing:
cb.MoveTo(doc.PageSize.Width / 2, doc.PageSize.Height / 2);
cb.LineTo(doc.PageSize.Width / 2, doc.PageSize.Height);
cb.Stroke();
cb.MoveTo(0, doc.PageSize.Height/2);
cb.LineTo(doc.PageSize.Width, doc.PageSize.Height / 2);
cb.Stroke();
The first line moves to the x, y coordinates specified in the parameters passed in, which in this case is halfway across the document, and halfway up (or the center point). The next line draws a line from this point to the position specified in the LineTo() method, which is still halfway across the document, but at the top of it. Actually, it doesn't "draw" it, but really only describes our intention. The line is only actually committed to the document when Stroke() is called. The second line is drawn from the lefthand edge, at a position halfway up the document to the righthand edge at the same height - so we end up with the top two quarters of the document outlined.
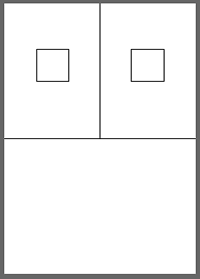
Using the same methodology, we can add a square to the top left quarter:
cb.MoveTo(100f, 700f);
cb.LineTo(200f, 700f);
cb.LineTo(200f, 600f);
cb.LineTo(100f, 600f);
cb.ClosePath();
cb.Stroke();
We didn't need to explicitly specify the coordinates for the final side of the square. ClosePath() automatically provides a line from the current position that we are at to the original coordinates. However, there is a quicker way of delivering a square (or rectangle) using one of the convenience shapes provided by iTextSharp. The next bit shows that is action, placing a square in the top right quarter of the document:
cb.Rectangle(doc.PageSize.Width-200f, 600f, 100f, 100f);
cb.Stroke();
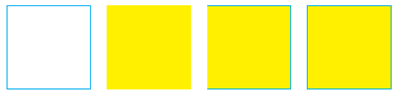
Four more squares are added to the page, each one illustrating the results of different methods other than Stroke(), used to consign them to the document. But first, the Stroke colour and the Fill colour are set. If you have worked with any graphics packages, such as PhotoShop or FireWorks, you will probably know that Stroke is the outline of an object, and Fill represents its internals bounded by the Stroke. I have used CMYK as the colour space, setting the Stroke colour to Cyan and the Fill colour to Yellow:
cb.SetColorStroke(new CMYKColor(1f, 0f, 0f, 0f));
cb.SetColorFill(new CMYKColor(0f, 0f, 1f, 0f));
cb.MoveTo(70, 200);
cb.LineTo(170, 200);
cb.LineTo(170, 300);
cb.LineTo(70, 300);
//Path closed and stroked
cb.ClosePathStroke();
cb.MoveTo(190, 200);
cb.LineTo(290, 200);
cb.LineTo(290, 300);
cb.LineTo(190, 300);
//Filled, but not stroked or closed
cb.Fill();
cb.MoveTo(310, 200);
cb.LineTo(410, 200);
cb.LineTo(410, 300);
cb.LineTo(310, 300);
//Filled, stroked, but path not closed
cb.FillStroke();
cb.MoveTo(430, 200);
cb.LineTo(530, 200);
cb.LineTo(530, 300);
cb.LineTo(430, 300);
//Path closed, stroked and filled
cb.ClosePathFillStroke();
When using a Rectangle object to represent a square or rectangle instead of drawing it, the first two parameters represent the x and y coordinates of the bottom right hand corner. The final two parameters are the width and height. Other preset shapes include the Circle, but the x and y coordinates that are passed in represent the center point of the shape, followed by a value representing the radius. Looking at the first of the 4 squares above, it is relatively easy to determine that the width and height is 100 points, and that the center point is at 120 x, 250 y. To add a circle to the square so that it fits nicely, the following code will do:
cb.SetCMYKColorStroke(255, 255, 0, 0);
cb.SetCMYKColorFill(0, 255, 255, 0);
cb.SetLineWidth(2f);
cb.Circle(120f, 250f, 50f);
cb.Fill();
Rather irritatingly, I found you have to guess at the actual values required by the two methods concerning the use of CMYK colour I have used so far. Neither was intuitive, given that generally, CMYK colours are represented as a series of percentages. For example, Warm Red is referenced as C: 0%, M: 100%, Y: 100%, K: 100%. The constructor for CMYKColor() requires four floats. Providing values that represent the percentages works fine. But I have provided values of 1f and 0f. In fact, I can provide any value I want, so long as it is a valid float. The values are treated as being relative to eachother, so for 100% blue (Cyan) i could just have validly provided 3000f, 0f, 0f, 0f. Strange, but workable if you stick to the usual CMYK percentages, and don't accidentally type in an extra zero.
The SetCMYKColorFill() method used just above accepts ints, rather than floats. I thought maybe this method was working on percentages as I would expect with CMYK, so I originally supplied the value 0, 100, 100, 0 to represent Warm Red. All I got was a washy pinky colour. I thought perhaps there was a bug in there somewhere, and that something was being affected by the previous setting of the Fill colour, so I deployed the ResetCMYKColorFill() method in the hope that it did something. Nope. All it did was reset to the default colour of black. Eventually, I found out CMYKColor is built on the ExtendedColor class, and can accept ints up to 255 - which is reminiscent of the RGB colour values and really confusing unless you know. I applied the values you see above, and got my desired result. To build on the oddity of this approach, I also discovered that there is nothing to prevent you entering values above 255. If you do, it seems that iTextSharp subtracts 255 from whatever you supply, so 256 is the equivalent of 1, and 510 is the equivalent of 255 - or at least, that's the results I got when I tried it.
Anyway, enough of the digression. Here's my red circle with a mauve border (2 points in width) in the first square:
Moving on, here's an example of using another preset shape, the ellipse. First, a rectangle is drawn, then an ellipse is added to fit neatly within it to illustrate how the positioning works through the parameters supplied to the constructor:
// x, y of bottom left corner, width, height
cb.Rectangle(100f, 200f, 300f, 100f);
cb.Stroke();
//Bottom left and top right coordinates
cb.Ellipse(100f, 200f, 400f, 300f);
cb.Stroke();
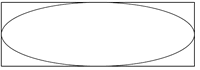
If the differences between the first and third parameter, and the second and fourth parameter are the same, you end up with a circle.
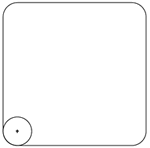
The next example shows another preset shape, the rounded rectangle. When one of these are drawn, the values passed in are the x and y coordinates for the bottom left hand corner, followed by the width and height, and finally the radius of the rounded corners. I have also added a circle in the corner with the same radius as the corner itself to show how the radius of the corner works. I've placed a cross at the center of the circle:
//Bottom left coordinates followed by width, height and radius of corners
cb.RoundRectangle(100f, 500f, 200f, 200f, 20f);
cb.Stroke();
cb.Circle(120f, 520f, 20f);
cb.Stroke();
cb.MoveTo(118f, 520f);
cb.LineTo(122f, 520f);
cb.Stroke();
cb.MoveTo(120f, 518f);
cb.LineTo(120f, 522f);
cb.Stroke();
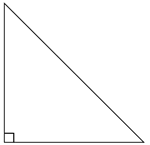
Triangles are relatively simple to do, just by drawing the three lines they require. Here's an example of a right-angled triangle with the right angle shown:
cb.MoveTo(350f, 450f);
cb.LineTo(350f, 600f);
cb.LineTo(500f, 450f);
cb.ClosePathStroke();
cb.MoveTo(350f, 460f);
cb.LineTo(360f, 460f);
cb.LineTo(360f, 450f);
cb.Stroke();
Curves and Arcs
Bezier curves are important in Vector Graphics, where they are based on mathematical equations rather than each individual point being specified along the path of the curve. They work by specifying a start point, an end point, and two control points. The first control point is specified in reference to the start point, and the second one is related to the end point. The curve will begin at the start point, and head towards the end point in the direction of the 1st control point. How far it gets near the control point will depend on the distance between the start point and its control point, and the end point and its control point, and the distance between the start and end point themselves. The control points are used for directional purposes, and are rarely hit by the path. If you have ever used a Vector graphics package, like Photoshop or Fireworks, you will have seen these control points, usually with little "handles" on the end of them which you can move to bend the curve.
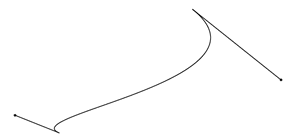
Here's an example of a curve, that starts at (200, 10), and ends at (350, 150).
//Start Point
cb.MoveTo(200f, 10f);
//Control Point 1, Control Point 2, End Point
cb.CurveTo(150f, 30f, 450f, 70f, 350f, 150f);
cb.Stroke();
The curve heads towards the first control point at (150, 30), then bends away towards the second control point at (450, 70), before arriving at the end point. It looks like this:
I'm not really sure that shows a lot, so I will add in some "handles" that show the control points:
cb.MoveTo(200f, 10f);
cb.LineTo(150f, 30f);
cb.Stroke();
cb.MoveTo(450f, 70f);
cb.LineTo(350f, 150f);
cb.Stroke();
cb.Circle(450f, 70f, 1f);
cb.Stroke();
cb.Circle(150f, 30f, 1f);
cb.Stroke();
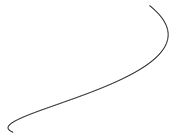
The first control point has a relatively short handle, so the curve only begins to move towards it. The second control point has a longer handle, and this starts to exert its influence on the curve along with the ultimate destination at a relatively early point in its journey, which is reflected in the way the line is "pulled" towards it. This effect is probably best illustrated by changing the second control point so that it is further away, and the angle is altered:
cb.SetColorStroke(Color.GREEN);
//start point (x,y)
cb.MoveTo(200f, 10f);
//control point 1 (x,y), control point 2 (x,y), end point (x,y)
cb.CurveTo(150f, 30f, 550f, 100f, 350f, 150f);
cb.Stroke();
cb.MoveTo(550f, 100f);
cb.LineTo(350f, 150f);
cb.Stroke();
cb.Circle(550f, 100f, 1f);
cb.Stroke();
cb.SetColorStroke(Color.LIGHT_GRAY);
//Bottom Left(x,y), Top Right(x,y), Start Angle, Extent
cb.Arc(350f, 70f, 550f, 130f, 270f, 90f);
cb.SetLineDash(3f, 3f);
cb.Stroke();
cb.SetLineDash(0f);
cb.MoveTo(550f, 100f);
cb.LineTo(535f, 95f);
cb.Stroke();
cb.MoveTo(550f, 100f);
cb.LineTo(552f, 88f);
cb.Stroke();
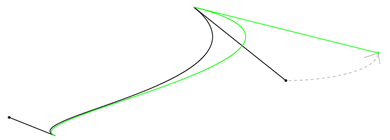
The original curve is shown in black, while the new one is shown in green. Now you can see that the increased length of the second "handle" has exerted its influence right from the start point, in that the green line starts just slightly beneath the original black one. Since the new second control point is further away from the end point, and is at a slightly more obtuse angle, the green line moves much further towards the second control point before finishing up at the end point.
There are a couple of other points to note about the code for the second curve. One is the Arc object, which has been used in this instance to create the curved arrow illustrating the movement of the original and new second control points. An Arc is part of an ellipse. In this case, the ellipse will fit into a rectangle that has a bottom left corner at (350, 70) and a top right corner at (550, 130). The default direction that an ellipse is drawn is counter-clockwise. The angle at which the arc is started is 270°, and only 90° of it are drawn. Secondly, the SetLineDash() method is shown for the first time in this series of articles, which allows me to draw the arrow as a dashed line.
