NOTE: jQuery Templates is a deprecated technology. If you are looking for a traditional approach to managing cascading dropdown lists with jQuery in Razor web pages, please see this article: WebMatrix - jQuery Cascading Dropdown Lists.
jQuery Templates are an official jQuery plugin. That means that they are maintained as part of the jQuery Project. They are still in Beta at the moment, but will be included as part of the core jQuery library in the next major release, which will be jQuery 1.5. In much the same way as the WebMatrix WebGrid helper is used to generate html (in this case a <table>) on the server, jQuery Templates allow you to generate html using client side script. Where they differ from the WebGrid helper is that you can define the html that they generate. You are not restricted to outputting a <table>. On the other hand, they share a major similarity with the WebGrid helper. As part of the template you define, you can add binding expressions which act as placeholders for data. It's probably a good idea at this point to have a look at a typical template.
Since I intend to illustrate cascading dropdown lists later, I'm going to re-use the data source I created for my original Cascading Dropdown Lists article from a couple of years ago. The data relates to cars, and each car has a number of properties:
- Make
- Model
- Year
- Colour
- Number of Doors
- Mileage
- Price
A typical template for displaying cars might look like this:
<script id="carTmpl" type="text/x-jQuery-tmpl">
    <div class="carListing">
        <h4>${Make} ${Model}</h4>
        <p>Year: ${Year}</p>
        <p>Doors: ${Doors}</p>
        <p>Colour: ${Colour}</p>
        <p>Mileage: ${Mileage}</p>
        <p>Price: ${Price}</p>
    </div>
</script>
The template appears in a <script> block, which has two attributes. One is an id, and the other is a type. You don't normally see an id attribute being applied to a <script> tag, but in this case, it is used to identify the specific template later in JavaScript code. The second attribute, type, is given a value of "text/x-jQuery-tmpl". This value is actually a MIME type which the browser won't understand. Consequently, it will not try to execute the contents of the <script> tag and most likely throw JavaScript errors in doing so. You could provide other values for type, such as "text/html", but "text/x-jQuery-tmpl" gives a clearer indication as to the purpose of the <script> block.
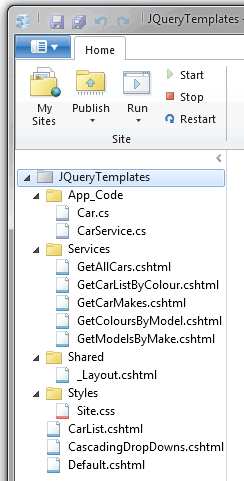
The content of the <script> block is a snippet of html. When you pass data to a template, the template is used as a basis for the html to be generated. The templating engine will attempt to find items in the data that match the binding expressions, which take the form of ${...}. In the example above, you can see a binding expression for each of the properties of the Car objects I am going to use. The templating engine will repeat the creation of html, using the template, for each of the individual items in the data being passed. Before I show how to use this template to display a list of cars, I will explain a little about the data, and how it is generated. Take a look at the following site structure:

There are two files in the App_Code folder. They are both C# class files. One, Car.cs defines a Car object and its properties. The other, CarService.cs, builds a list of Car objects, and provides methods that external code can call to obtain some or all of the data. Some of the methods are illustrated below:
public static List<Car> GetAllCars()
{
    return Cars.ToList();
}

public static List<Car>  GetCarMakes()
{
    return (Cars.OrderBy(c => c.Make)
                                .Select(c => new Car {
                                    Make = c.Make
                                }))
                                .GroupBy(c=> c.Make)
                                .Select(c => c.First()).ToList();

}


public static List<Car> GetModelsByMake(string make)
{
  return (Cars.Where(c => c.Make == make)
                                .OrderBy(c => c.Model)
                                .Select(c => new Car{
                                    Model = c.Model
                                }))
                                .GroupBy(c => c.Model)
                                .Select(c => c.First()).ToList();
}
The first method returns a List<Car> containing all the cars. The second returns a list of all the Makes (Audi, BMW, Citroen etc) and the third method returns a list of all the Models for each Make, so for BMW, for example, the data might be "1 Series", "3 Series", "5 Series" etc. You can view the accompanying download for the other methods. Ideally, the data needs to be exposed as JSON for jQuery Templates to work nicely. The Services folder contains five files, each of which contains a call to a single method in the the CarService class, and converts the List<Car> that gets returned from the CarService to JSON using the Web Pages JSON helper. As an example, here's the content of GetAllCars.cshtml:
@{
    var data = CarService.GetAllCars();
    Json.Write(data, Response.Output);
}
The CarList.cshtml file contains a basic example of how to use jQuery Templates. Here's the full code for that file:
@{
    Layout = "~/Shared/_Layout.cshtml";
}

<script type="text/javascript">
$(function(){
    $.getJSON(
        "Services/GetAllCars/",
        function(data) {
            $("#carTmpl").tmpl(data).appendTo("#carList");
        });
});
function formatPrice(price) {
    return "£" + price.toFixed(0);
}
</script>
<script id="carTmpl" type="text/x-jQuery-tmpl">
    <div class="carListing">
        <h4>${Make} ${Model}</h4>
        <p>Year: ${Year}</p>
        <p>Doors: ${Doors}</p>
        <p>Colour: ${Doors}</p>
        <p>Mileage: ${Mileage}</p>
        <p>Price: ${formatPrice(Price)}</p>
    </div>
</script>
<h2>Basic Template</h2>
<div id="carList"></div>
The file defines its Layout page, which includes references to two JavaScript files hosted on Microsoft's AJAX Content Delivery Network (CDN):
<script type="text/javascript" src="http://ajax.aspnetcdn.com/ajax/jQuery/jquery-1.4.4.js"></script>
<script type="text/javascript" src="http://ajax.aspnetcdn.com/ajax/jquery.templates/beta1/jquery.tmpl.js"></script>
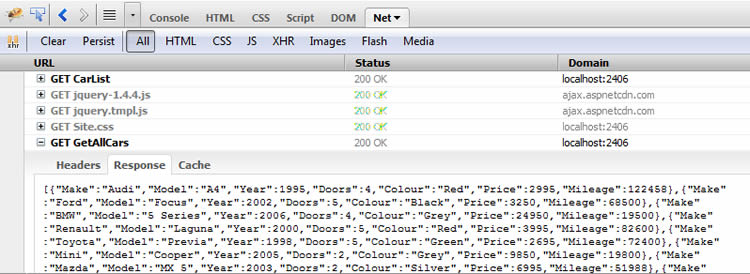
Following that, there are two <script> blocks. The second of these contains the template that will be applied to the data, and is mostly the same as the previous template example you saw. The first block is actual JavaScript to be executed. When the browser is ready, an AJAX call is made to the GetAllCars.cshtml file in the Services folder (taking advantage of Web Pages built-in support for Routing) which returns the data as JSON. This can clearly be seen in the following illustration which shows the response captured using the FireBug addon in Firefox:

This is passed to the data parameter of the next function, which takes care of binding the data to the template and rendering it:
$("#carTmpl").tmpl(data).appendTo("#carList");
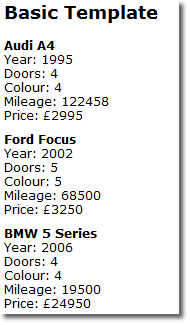
Or in other words - "take the element with the id of carTmpl (our script block) and use it as a template (the .tmpl command), binding the contents of the data variable (the JSON string) and append the resulting html to the element with the id of carList". The result looks like this:

There is one other thing to note, and that is that the binding expression within a template can contain a call to a function. You can see this in the way that the price property of each Car object has been formatted using a function to prefix the data with a £ sign.
Cascading Select Lists From jQuery Templates
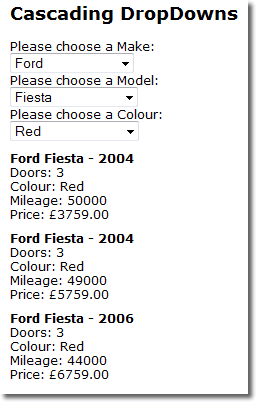
Select lists are just a bunch of html with a bit of data, aren't they? So it should be feasible to create fully functioning Cascading Select Lists (DropDowns) with jQuery Templates, right? And indeed it is quite straightforward as you will see. The following example presents three select lists in total. The first one lists all Makes of car within the data. Once a Make has been selected, all the Models associated with that Make populate the second select list, and once a Model has been selected, all available colours are presented in the third select list. Finally, when the user chooses their preferred colour from the available options, all cars meeting the selected Make, Model and Colour criteria are displayed. The end result will look like this:

To start with, here's the entire HTML for the CascadingDropDowns.cshtml file:
<h2>Cascading DropDowns</h2>
<p>Please choose a Make:</p>
<select id="makeList"><option value="0"> -- Select Make -- </option></select>
<p>Please choose a Model:</p>
<select id="modelList"><option value="0"> -- Select Model -- </option></select>
<p>Please choose a Colour:</p>
<select id="colourList"><option value="0"> -- Select Colour -- </option></select>
<div id="results"></div>
Yep - that's it. A heading, three <select> elements and an empty, but named <div> element. Next, here are the definitions for the Templates:
<script id="makeTmpl" type="text/x-jQuery-tmpl">
        <option value="${Make}">${Make}</option>
</script>

<script id="modelTmpl" type="text/x-jQuery-tmpl">
        <option value="${Model}">${Model}</option>
</script>

<script id="colourTmpl" type="text/x-jQuery-tmpl">
        <option value="${Colour}">${Colour}</option>
</script>

<script id="detailsTmpl" type="text/x-jQuery-tmpl">
    <div class="carListing">
        <h4>${Make} ${Model} - ${Year}</h4>
        <p>Doors: ${Doors}</p>
        <p>Colour: ${Colour}</p>
        <p>Mileage: ${Mileage}</p>
        <p>Price: ${formatPrice(Price)}</p>
    </div>
</script>
The first three template definitions cater for the select lists: one for the Make, one for the Model and the final one for the Colour selector. The final template is the one that was used in the previous example to display the car details. the JavaScript block is where the action happens:
<script type="text/javascript">
$(function(){
    $('#modelList').attr('disabled', true);
    $('#colourList').attr('disabled', true);
    $('#makeList').bind('change', function(){getModels()});
    $.getJSON(
        "Services/GetCarMakes/",
        function(data){
            $('#makeTmpl').tmpl(data).appendTo('#makeList');
        });
});
function getModels(){
    if($('#makeList').val() != "0"){
        $.getJSON(
        "Services/GetModelsByMake/"+ $('#makeList').val(),
        function(data) {
                $('#modelList').attr('disabled', false);
                $('#modelList').html('<option value="0"> -- Select Model -- </option>');
                $('#modelList').unbind('change').bind('change', function(){getColours()});
                $('#modelTmpl').tmpl(data).appendTo('#modelList');
            });
    }else{
        $('#modelList').attr('disabled', true);
    }
}
function getColours(){
    if($('#modelList').val() != "0"){
        $.getJSON(
        "Services/GetColoursByModel/"+ $('#modelList').val(),
        function(data) {
                $('#colourList').attr('disabled', false);
                $('#colourList').html('<option value="0"> -- Select Colour -- </option>');
                $('#colourList').unbind('change').bind('change', function(){getDetails()});
                $('#colourTmpl').tmpl(data).appendTo('#colourList');
            });
    }else{
        $('#colourList').attr('disabled', true);
    }
}
function getDetails(){
    if($('#colourList').val() != "0"){
        var make = $('#makeList').val();
        var model = $('#modelList').val();
        var colour = $('#colourList').val();
    $.getJSON(
        "Services/GetCarListByColour/" + make + "/" + model + "/" + colour,
        function(data) {
                $('#results').empty();
                $('#detailsTmpl').tmpl(data).appendTo('#results');
            });
    }else{
        $('#colourList').attr('disabled', true);
    }
}
function formatPrice(price) {
    return "£" + price.toFixed(2);
}
</script>
When the page loads, the second and third select lists are disabled so that they can't be used. But the first select list is populated with data retrieved by a jQuery getJSON call to the GetCarMakes method in CarService.cs. The getJSON call is actually routed to the GetCarMakes file which calls the CarService and converts the data to JSON in exactly the same way as the earlier GetAllCars method:
@{
    var data = CarService.GetCarMakes();
    Json.Write(data, Response.Output);
}
At the same time, an event handler is bound to the onchange event of the select list, which calls another JavaScript method - getModels(). This function is executed when a Make is selected, and enables the Models select list prior to fetching the data for it. Then the data is bound to the template and the resulting <option> elements are added to the select list. Finally, another event handler handler is bound to the onchange event that fetches the colour data based on the selected Model, which is passed as UrlData:
@{
    var data = CarService.GetColoursByModel(UrlData[0]);
    Json.Write(data, Response.Output);
}
And once a colour is selected, all three values: Make, Model and Colour are passed in the URL to the GetCarsByColour method:

The code for the GetCarsByColour method:
@{
    var data = CarService.GetCarListByColour(UrlData[0], UrlData[1], UrlData[2]);
    Json.Write(data, Response.Output);
}
Finally, the resulting data is bound to the final template, providing the listing of selected cars as seen in the previous image.
I included the word "Razor" in the title of this post, and in truth, the only line of Razor code in the CascadingDropDowns.cshtml file is that which references the Layout page. The file could just as easily have been a plain .html file, and it would have still worked in just the same way - given access to a source of JSON data. So where would you get such a source - apart from creating your own service that uses the JSONHelper? Well, one source could well be an OData feed, such as that provided by Netflix.com.
jQuery Templates provide an extraordinarily versatile client-side html generation mechanism, especially when combined with data binding. Although the cascading select lists paradigm has a number of tried and tested solutions, jQuery Templates provides a neat new twist.
