Download the code
The code for this section is available here. Save the .zip file to a convenient location and then extract the contents. Make sure you have an edition of Visual Studio 2013 installed (Express for Web, Community, Professional, Premium or Ultimate) and double click the .sln file. Once the project is opened in your IDE, press Shift+Ctrl+B to build the solution. This will ensure that all packages are restored from Nuget and may take a while depending on your Internet connection speed.
The navigation path through the complete series of 13 tutorials is as follows:
- Creating an Entity Framework Data Model
- Implementing Basic CRUD Functionality
- Sorting, Filtering and Paging
- Connection Resiliency and Command Interception
- Code First Migrations and Deployment
- Creating a More Complex Data Model
- Reading Related Data
- Updating Related Data
- Async and Stored Procedures
- Handling Concurrency
- Implementing-Inheritance
- Advanced Entity Framework Scenarios
- (Bonus Tutorial) Working With Files
Should I store files in the database or file system?
One of the most often asked question in developer forums, the answer to this conundrum is "it depends". There are pros and cons to both approaches and this tutorial will not seek to add to the debates, but will cover how to approach both options. You will modify the Student CRUD methods and views to store avatar images in the database. Then you will modify the Instructor CRUD methods and views to store images in the field system and their meta-data (name, location) in the database.
Create FileType Enumeration for File Types
The application will cater for files that will be used for a variety of purposes, some of which aren't known at the moment. The two types of file that you will start with will be images that serve as an Avatar for a student, and a photo for an instructor. One approach to this might be to add a new property to the User entity for each file. However, it is in the nature of software development that one day, a stakeholder will ask for the application to be modified to cater for personal reports, grades, meeting notes and all sorts of other files. Every time you need to cater for a new file type, you will have to alter the User class and add a new migration. Instead, you will create an enumeration to denote the purpose of each file, and add one property to the user entity to hold a collection of files, regardless of their purpose.
Add a new class file to the Models folder and name it FileType.vb. Replace the existing code with the following:
Public Enum FileType
    Avatar = 1
    Photo
End Enum
Storing Files in the Database
The first example will cover storing files as binary data in the database table. If you have already decided to store files in the file system and want to skip this part, feel free to navigate to the second part of the tutorial.
Create File Entity
Newer versions of SQL Server offer the FileStream data type for storing file data. Existing versions of Entity Framework (6.1.2 as of the publication date of this tutorial) do not support the FileStream data type via Code First. When you store file content in a database, the content itself is stored in binary format. This is represented as an array of bytes in .NET which Entity Framework (currently) maps to the SQL Server varbinary(max) data type.
-
Right click on the Models folder and choose Add New Item. Add a class file, name it File.vb and replace the existing content with the following:
Imports System.ComponentModel.DataAnnotations

Namespace Models
    Public Class File
        Public Property FileId As Integer
        <StringLength(255)>
        Public Property FileName As String
        <StringLength(100)>
        Public Property ContentType As String
        Public Property Content As Byte()
        Public Property FileType As FileType
        Public Property PersonID As Integer
        Public Overridable Property Person As Person
    End Class
End Namespace
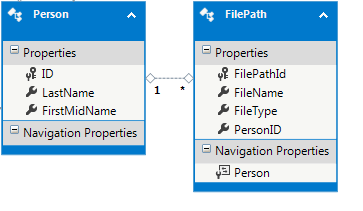
The File entity has an overridable
Personproperty, which is one part of establishing a one-to-many relationship with thePersonclass.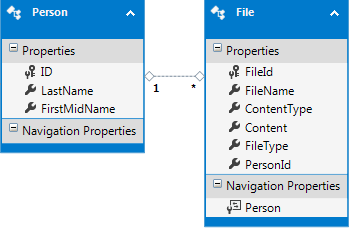
Complete this association by adding a collection of files as a property to the Person class:
Public Overridable Property Files As ICollection(Of File)
-
Now add a
DbSetto theSchoolContextclass:Public Property Files As DbSet(Of File)
-
Add a new migration by typing the following into the Package Manager Console(PMC):
add-migration Files
Run the migration by typing the following into the PMC.
update-database
Change the Student Create Form and Controller
Make the highlighted changes to the Create.vbhtml file in the Views\Student folder:
@Using (Html.BeginForm("Create", "Student", Nothing, FormMethod.Post, New With{.enctype = "multipart/form-data"}))
    @Html.AntiForgeryToken()

    @<div class="form-horizontal">
        <h4>Student</h4>
        <hr />
        @Html.ValidationSummary(true)
        <div class="form-group">
            @Html.LabelFor(Function(model) model.LastName, New With { .class = "control-label col-md-2" })
            <div class="col-md-10">
                @Html.EditorFor(Function(model) model.LastName)
                @Html.ValidationMessageFor(Function(model) model.LastName)
            </div>
        </div>

        <div class="form-group">
            @Html.LabelFor(Function(model) model.FirstMidName, New With { .class = "control-label col-md-2" })
            <div class="col-md-10">
                @Html.EditorFor(Function(model) model.FirstMidName)
                @Html.ValidationMessageFor(Function(model) model.FirstMidName)
            </div>
        </div>

        <div class="form-group">
            @Html.LabelFor(Function(model) model.EnrollmentDate, New With { .class = "control-label col-md-2" })
            <div class="col-md-10">
                @Html.EditorFor(Function(model) model.EnrollmentDate)
                @Html.ValidationMessageFor(Function(model) model.EnrollmentDate)
            </div>
        </div>

         <div class="form-group">
             @Html.Label("Avatar", New With {.class = "control-label col-md-2"})
             <div class="col-md-10">
                 <input type="file" id="Avatar" name="upload" />
             </div>
         </div>

        <div class="form-group">
            <div class="col-md-offset-2 col-md-10">
                <input type="submit" value="Create" class="btn btn-default" />
            </div>
        </div>
    </div>
End Using
You have added a file upload to the form:
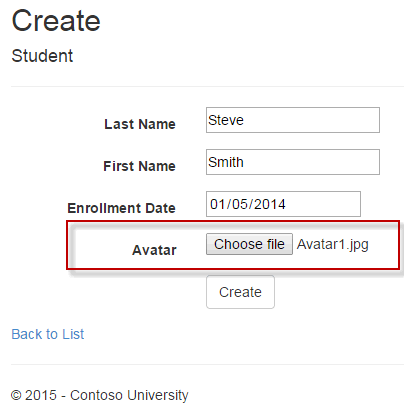
You did this by specifying the type as "file" on an input element. However, this is not enough to ensure that uploaded file data is accessible on the server. You also used one of the longer overloads of the Html.BeginForm helper to add an enctype attribute to the form and sets its value to multipart/form-data. This is an essential step to getting file uploading to work.
Now add the highlighted code below to the HttpPost Create method in the StudentsController:
<HttpPost()>
<ValidateAntiForgeryToken()>
Function Create(<Bind(Include:="ID,LastName,FirstMidName,EnrollmentDate")> ByVal student As Student, ByVal upload As HttpPostedFileBase) As ActionResult
    Try
        If ModelState.IsValid Then
            If Not upload Is Nothing Then
                If upload.ContentLength > 0 Then
                    Dim avatar = New File()
                    avatar.FileName = upload.FileName
                    avatar.ContentType = upload.ContentType
                    avatar.FileType = FileType.Avatar
                    Using reader = New System.IO.BinaryReader(upload.InputStream)
    				avatar.Content = reader.ReadBytes(upload.ContentLength)
					End Using
                    student.Files = New List(Of File)
                    student.Files.Add(avatar)
                End If
            End If
            db.Students.Add(student)
            db.SaveChanges()
            Return RedirectToAction("Index")
        End If
    Catch dex As RetryLimitExceededException
        'Log the error (add a line here to write a log)
        ModelState.AddModelError("", "Unable to save changes. Try again, and of the problem persists see your system administrator. ")
    End Try
    Return View(student)
End Function
The first change adds a new parameter to the Create method's signature - upload, which is an instance of the HttpPostedFileBase type. The parameter name matches the name attribute's value of the input type="file" in the Create form so that the MVC model binder can bind the uploaded file to the parameter that you added to the Create method.
The highlighted code block that you added is responsible for extracting the binary data from the request and populating a new File entity instance ready to be added to the student's Files collection. If the user adds a new student without uploading a file, the upload parameter will equate to Nothing, which is why that condition is checked before any attempt to access the HttpPostedFileBase ContentLength property. If you do not perform this check, and then reference the ContentLength property when no file has been uploaded, an exception will be raised. You then check the ContentLength because it is perfectly possible to upload an empty file. If the user does that, the ContentLength property will return 0, and there is no point in storing a file with no data in it. If the upload passes both tests, you create a new File object and assign the relevant properties with values taken from the upload parameter. The binary data is obtained from the InputStream property of the uploaded file, and a Stream object is used to read that into the Content property of the File object. Finally, you add the new File object to the student object.
Change the Details method and View
Having stored the image in the database, you need to make some alterations to obtain the image and display it in the Details view. First, you will use the Include method in the LINQ query that fetches the student from the database to bring back releated files. The Include method does not support filtering, so the highlighted line below fetches all files associated with the student regardless of type.
' GET: /Student/Details/5
Function Details(ByVal id As Integer?) As ActionResult
    If IsNothing(id) Then
        Return New HttpStatusCodeResult(HttpStatusCode.BadRequest)
    End If
    Dim student As Student
    student = db.Students.Include(Function(s) s.Files).SingleOrDefault(Function(s) s.ID = id)
    If IsNothing(student) Then
        Return HttpNotFound()
    End If
    Return View(student)
End Function
Add the highlighted section of code to the Views\Student\Details.vbhtml file.
<h4>Student</h4>
<hr />
<dl class="dl-horizontal">
    @If Model.Files.Any(Function(f) f.FileType = FileType.Avatar) Then
        @<dt>
            Avatar
        </dt>
        @<dd>
            <img src="~/File?id=@Model.Files.First(Function(f) f.FileType = FileType.Avatar).FileId" alt="avatar" />
        </dd>
    End If
    <dt>
        @Html.DisplayNameFor(Function(model) model.LastName)
    </dt>
You returned all of the files associated with the student (if there are any), so you must check to see if there are any files matching the Avatar file type. If there are, you render the first of these files. The image is rendered using a standard HTML img tag.
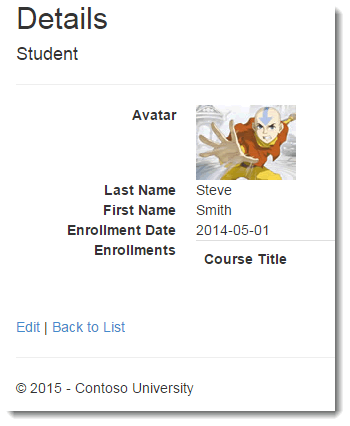
By convention, the url of the image maps to the Index method of a controller called File, passing in the id of the file as a query string value.
Adding the File Controller
-
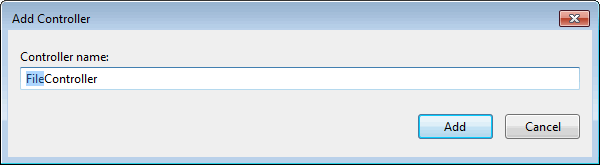
Right click on the Controllers folder and choose Add.. Controller
Choose MVC 5 Controller - Empty from the selection.
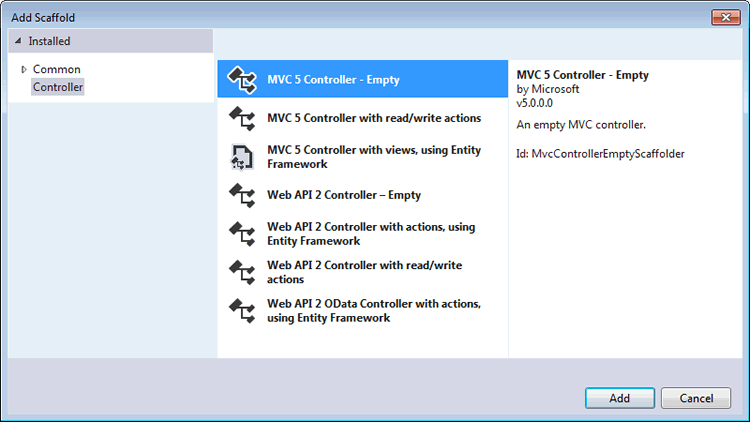
Name it FileController.
Replace the templated code with the following:
Imports System.Web.Mvc
Imports ContosoUniversity.DAL

Public Class FileController
    Inherits Controller

    Private db As New SchoolContext

    ' GET: /File
    Function Index(ByVal id As Integer) As ActionResult
        Dim fileToRetrieve = db.Files.Find(id)
        Return File(fileToRetrieve.Content, fileToRetrieve.ContentType)
    End Function
End Class
The code obtains the correct file based on the id value passed in the query string. Then it returns the image to the browser as a
FileResult.
You have completed the functionality to add an image to be stored in the database to a new student and display it as part of their details. The next section covers how to provide functionality to allow users to edit an existing student's avatar image.
Customise the Edit Methods and View
-
Alter the code in the
HttpGet Editmethod in theStudentControllerto include the retrieval of files as in the highlighted code below.' GET: /Student/Edit/5 Function Edit(ByVal id As Integer?) As ActionResult If IsNothing(id) Then Return New HttpStatusCodeResult(HttpStatusCode.BadRequest) End If Dim student As Student = db.Students.Include(Function(s) s.Files).Where(Function(s) s.ID = id).First() If IsNothing(student) Then Return HttpNotFound() End If Return View(student) End Function
-
Alter the Views\Student\Edit.vbhtml file to include the correct
enctypeattribute in the form, and to both display the existing image and to provide a file upload should the user wish to provide a replacement:@Using (Html.BeginForm("Edit", "Student", Nothing, FormMethod.Post, New With{.enctype = "multipart/form-data"})) @Html.AntiForgeryToken() @<div class="form-horizontal"> <h4>Student</h4> <hr /> @Html.ValidationSummary(True) @Html.HiddenFor(Function(model) model.ID) <div class="form-group"> @Html.LabelFor(Function(model) model.LastName, New With {.class = "control-label col-md-2"}) <div class="col-md-10"> @Html.EditorFor(Function(model) model.LastName) @Html.ValidationMessageFor(Function(model) model.LastName) </div> </div> <div class="form-group"> @Html.LabelFor(Function(model) model.FirstMidName, New With {.class = "control-label col-md-2"}) <div class="col-md-10"> @Html.EditorFor(Function(model) model.FirstMidName) @Html.ValidationMessageFor(Function(model) model.FirstMidName) </div> </div> <div class="form-group"> @Html.LabelFor(Function(model) model.EnrollmentDate, New With {.class = "control-label col-md-2"}) <div class="col-md-10"> @Html.EditorFor(Function(model) model.EnrollmentDate) @Html.ValidationMessageFor(Function(model) model.EnrollmentDate) </div> </div> @If Model.Files.Any(Function(f) f.FileType = FileType.Avatar) Then @<div class="form-group"> <span class="control-label col-md-2"> Current Avatar</span> <div class="col-md-10"> <img src="~/File?id=@Model.Files.First(Function(f) f.FileType = FileType.Avatar).FileId" alt="avatar" /> </div> </div> End If <div class="form-group"> @Html.Label("Avatar", New With {.class = "control-label col-md-2"}) <div class="col-md-10"> <input type="file" id="Avatar" name="upload" /> </div> </div> <div class="form-group"> <div class="col-md-offset-2 col-md-10"> <input type="submit" value="Save" class="btn btn-default" /> </div> </div> </div> End Using
-
Make the highlighted changes to the
HttpPost Editmethod as shown below.<HttpPost(), ActionName("Edit")> <ValidateAntiForgeryToken()> Function EditPost(ByVal id? As Integer, ByVal upload As HttpPostedFileBase) As ActionResult If id Is Nothing Then Return New HttpStatusCodeResult(HttpStatusCode.BadRequest) End If Dim studentToUpdate = db.Students.Include(Function(s) s.Files).Where(Function(s) s.ID = id).First() If TryUpdateModel(studentToUpdate, "", New String() {"LastName", "FirstMidName", "EnrollmentDate"}) Then Try If Not upload Is Nothing Then If upload.ContentLength > 0 Then If studentToUpdate.Files.Any(Function(f) f.FileType = FileType.Avatar) Then db.Files.Remove(studentToUpdate.Files.First(Function(f) f.FileType = FileType.Avatar)) End If Dim avatar = New File() avatar.FileName = upload.FileName avatar.ContentType = upload.ContentType avatar.FileType = FileType.Avatar Dim fileStream = upload.InputStream avatar.Content = New Byte(upload.ContentLength - 1) {} fileStream.Read(avatar.Content, 0, upload.ContentLength) studentToUpdate.Files.Add(avatar) End If End If db.Entry(studentToUpdate).State = EntityState.Modified db.SaveChanges() Return RedirectToAction("Index") Catch Dex As DataException 'Log the error (uncomment dex variable name and add a line here to write a log. ModelState.AddModelError("", "Unable to save changes. Try again, and if the problem persists see your system administrator.") End Try End If Return View(studentToUpdate) End Function
You altered the signature of the HttpPost Edit method to accept an instance of the HttpPostedFile. As in the Create method, this represents the uploaded file. The highlighted code block checks to see if a file was uploaded, and if one was, that it contains data. These are the same checks as you made in the Create method. If the file contains data, you find any existing files associated with the current student that are Avatar file types. If found, you mark the file for deletion. Then you add the uploaded file as a replacement.
Working with the file system
The next section covers how to store uploaded files in the file system instead of in the database. You will create a FilePath entity to represent a single file.
-
Add a new class to the Models folder called FilePath.vb and replace the templated code with the following:
Imports System.ComponentModel.DataAnnotations

Namespace Models
    Public Class FilePath
        Public Property FilePathId As Integer
        <StringLength(255)>
        Public Property FileName As String
        Public Property FileType As FileType
        Public Property PersonID As Integer
        Public Overridable Property Person As Person
    End Class
End Namespace
-
Add a
DbSetto theSchoolContextfor the new entity:Public Property FilePaths As DbSet(Of FilePath)
-
Add a new navigational property to the
Personclass to accommodate a collection ofFilePathobjects:Public Overridable Property FilePaths As ICollection(Of FilePath)
This creates the one-to-many relationship between Person and FilePath:
-
Press Ctrl+Shift+B to ensure that your project builds successfully, then add a new migration to the project by typing the following into the PMC:
add-migration FilePaths
-
Apply the changes to the database by typing
update-databaseinto the PMC.
Amending the Instructor Create and Details Views and Methods
In this example, you will only alter the Create and Details methods and views. These alterations cover the core concepts that you need to understand when saving files to the file system.
First, add a folder to the root directory called images.
-
Alter the
Html.BeginFormhelper in Views\Instructor\Create.vbhtml to add the correctenctypeto the form:@Using (Html.BeginForm("Create", "Instructor", Nothing, FormMethod.Post, New With {.enctype = "multipart/form-data"}))
-
Now add a file input to the form itself, just after the Office Location input and before the div that houses the assigned courses checkboxes:
<div class="form-group">
     @Html.Label("Photo", New With {.class = "control-label col-md-2"})
     <div class="col-md-10">
         <input type="file" id="Photo" name="upload" />
     </div>
</div>
-
Add the following Imports directive to the top of the InstructorController.vb file:
Imports System.IO
-
Make the highlighted changes to the
HttpPost Createmethod in InstructorController.vb:<HttpPost()> <ValidateAntiForgeryToken()> Function Create(<Bind(Include:="ID,LastName,FirstMidName,HireDate,OfficeAssignment")> ByVal instructor As Instructor, ByVal selectedCourses As String(), ByVal upload As HttpPostedFileBase) As ActionResult If selectedCourses IsNot Nothing Then instructor.Courses = New List(Of Course) For Each id In selectedCourses Dim courseToAdd = db.Courses.Find(Integer.Parse(id)) instructor.Courses.Add(courseToAdd) Next End If If upload IsNot Nothing Then If upload.ContentLength > 0 Then Dim photo = New FilePath() photo.FileName = Path.GetFileName(upload.FileName) 'use the existing file's name photo.FileType = FileType.Photo instructor.FilePaths = New List(Of FilePath) instructor.FilePaths.Add(photo) upload.SaveAs(Path.Combine(Server.MapPath("~/images"), photo.FileName)) End If End If If ModelState.IsValid Then db.Instructors.Add(instructor) db.SaveChanges() Return RedirectToAction("Index") End If PopulateAssignedCourseData(instructor) Return View(instructor) End Function
You added an additional parameter to the Create method's signature - upload of type HttpPostedFileBase. This is mapped to the file upload based on the parameter's name matching the name attribute on the input type=file that you added in the Create view, and provides access to the properties of the uploaded file. The added code checks to ensure that the upload is not null and then checks its ContentLength property to ensure that an empty file as not uploaded. If both of those checks succeed, a new FilePath object is created and its FileName property is assigned the value of the uploaded file's FileName, which is obtained by the System.IO.Path.GetFileName method.
Note: Some browsers provide more than just the file name when files are uploaded. Versions of Internet Explorer will provide the full client file path when you use it locally, i.e in development and test. Other browsers may or may not prepend the file name with values such as C:\FakePath\. In any event, you cannot rely on a browser providing just the file's name. Equally, you cannot rely on the browser to provide the original path of the uploaded file. Only some versions of Internet Explorer (currently) do this, and even then, only when your client and server are the same machine.
The file itself is saved to the images folder using the value extracted from the upload as the file name.
Note: it is not always a good idea to use the file's original name when you store uploads in the file system. Two files with the same name cannot exist in the same location so if a new file is uploaded and saved with the same name as an existing one, the original file will be overwritten when the new one is saved. A common resolution to this problem is to rename the file prior to saving it. Typically, a Guid is used as a file name on the basis that it can pretty much guarantee uniqueness. If you need to adopt this strategy, you can replace the existing line that assigns the FilePath object's FileName property with the following two lines of code:
Dim fileName = Guid.NewGuid().ToString() & Path.GetExtension(upload.FileName)
photo.FileName = fileName
Amend the Instructor Details Method and View
Make the highlighted amendment to the Details method in InstructorController.vb:
Function Details(ByVal id As Integer?) As ActionResult
    If IsNothing(id) Then
        Return New HttpStatusCodeResult(HttpStatusCode.BadRequest)
    End If
    Dim instructor As Instructor = db.Instructors.Include(Function(i) i.FilePaths).Single(Function(i) i.ID = id)
    If IsNothing(instructor) Then
        Return HttpNotFound()
    End If
    Return View(instructor)
End Function
Finally, add the following code to the Views\Instructor\Details.vbhtml filejust before the closing </dl> tag
@If Model.FilePaths.Any(Function(f) f.FileType = FileType.Photo) Then
    @<dt>
        Photo
    </dt>
    @<dd>
        <img src="~/images/@Model.FilePaths.First(Function(f) f.FileType = FileType.Photo).FileName" alt="" />
    </dd>
End If
The alteration that you made to the Details method in the controller ensures that any filepath objects belonging to the instructor are retrieved along with the rest of their details. The code that you added to the View checks to see if there are any filepath objects matching the FileType.Photo type, and if there are, the first one is displayed using an img element. The src attribute value is generated by concatenating the location where files are saved with the name that was given to this particular file. Notice that you didn't include the folder name as part of the value that you used for the FileName property. Doing so may make things more diffcult if you ever needed to change the file storage location.
Summary
In this tutorial, you saw how to use Entity Framwork to work with files in an MVC application. You explored two approaches to persisting file information: storing the file data in the database; and storing the file in the file system.
