What is Web API?
Part of ASP.NET, Web API is a framework for building HTTP-based services. Typically, that means making data available as a service via the HTTP protocol. Services built using Web API conform to the REpresentational State Transfer (REST) architectural pattern. An important element of this is that the service should respond appropriately based on the HTTP verb that was used to make the request (GET, POST, PUT, DELETE etc.). Different verbs are used by the client making the request to express the intent behind the operation. They map to CRUD operations as follows:
| HTTP Verb | CRUD Operation |
POST |
Create |
GET |
Read |
PUT |
Update |
DELETE |
Delete |
Out of the box, Web API delivers data to clients in two formats: JSON (the default) and XML. It is also possible to plug in different formatters to deliver data in other formats. Web API uses content negotiation to decide which format to deliver in response to any particular request. That means that the client, regardless what it is (browser, mobile, web, WPF or other type of app - or anything else capable of generating HTTP requests) can decide what format it wants to work with. This is one of the most powerful aspects of the framework. When combined with the Entity Framework, Web API supports the Open Data Protocol (oData) which offers clients the capability to query data using a range of query operators passed as part of the request. These features are just some of the factors that make Web API a compelling option compared to plain .cshtml files when you want to implement endpoints that just deliver data.
Adding Web API
How you go about adding Web API depends on the version of ASP.NET Web Pages that you are using. If you are working with an existing site that was built using WebMatrix, or you used Visual Studio to create the site from the Razor v 2 template, your site is most likely to be using Web Pages 2, which targets .NET 4. If you built the site using a Razor v3 template in Visual Studio, you are using Web Pages 3, which targets .NET 4.5. The distinction between the two versions is important as it has a bearing on the version of Web API that you can use in your site. Either way, you will install Web API via Nuget, which means you will need to use Visual Studio to include Web API because the Nuget tooling in WebMatrix is not sophisticated enough to allow you to target specific versions. You can use any version of Visual Studio. The Express edition for Web is a good option and is free, as is the Community Edition, which is basically the full Professional edition with some licencing restrictions.
Creating a Solution
When you use Nuget from within WebMatrix, package information is stored in the App_Data folder, which is only relevant to web sites. Visual Studio caters for multiple project types - console apps, class libraries, Windows Forms apps and so on, none of which have App_Data folders. Instead, Visual Studio's Nuget integration expects a project or solution folder to exist, and looks to store package information there. So before you try opening your site in Visual Studio, you need to create a solution for it.
-
Choose the New Project option from the File menu and scroll down to Other Project Types. Select Blank Solution from the Visual Studio Solutions option.
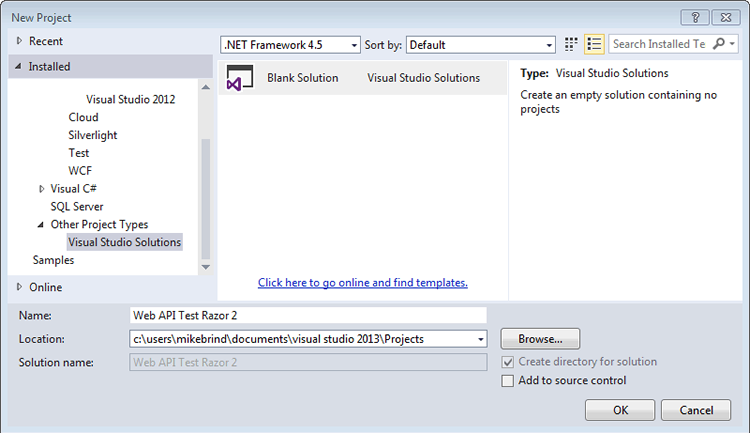
Choose a location for the solution and give it a name.
-
Once the solution opens, right click on the name in Solution Explorer and choose Add » Existing Web Site
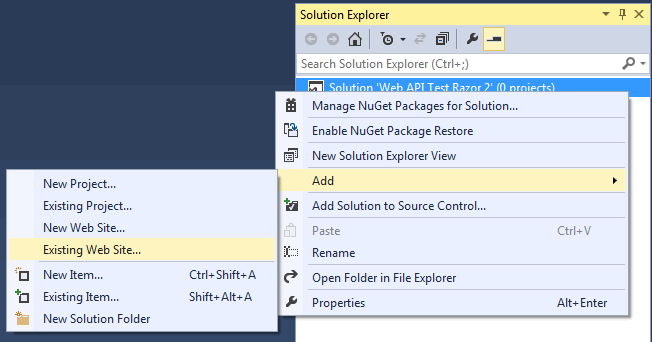
Navigate to your existing site and add it to the solution.
Installing Web API
You will use the Visual Studio Nuget integration to install a version of Web API that your existing application can support. This walk-through will demonstrate using the Package Manager Console to perform the installation because it provides finer grained control over the version of any package you want to install. This will be necessary particularly if you are adding Web API to an existing Razor Web Pages 2 site.
-
Navigate to Tools » Library Package Manager » Package Manager Console

If your site is a Web Pages 2 site, enter the following into the Package Manager Console:
Install-Package Microsoft.AspNet.WebApi -Version 4.0.30506
If your site is built using Web Pages 3, leave off the
-versionswitch:Install-Package Microsoft.AspNet.WebApi
-
If your site is a Web Pages 2 site, add the following to your web.config file just before the closing
</configuration>tag:<system.webServer> <handlers> <remove name="ExtensionlessUrlHandler-Integrated-4.0" /> <remove name="OPTIONSVerbHandler" /> <remove name="TRACEVerbHandler" /> <add name="ExtensionlessUrlHandler-Integrated-4.0" path="*." verb="*" type="System.Web.Handlers.TransferRequestHandler" preCondition="integratedMode,runtimeVersionv4.0" /> </handlers> </system.webServer>
Routes and Web API Controllers
In Web Pages, URLs map to physical files. Unless you use the Web Pages Routing package, a URL must match the path of a file, so a request to www.domain.com/about will expect to find a file called about.cshtml or about.vbhtml in the root folder of the site. The Web API framework (and ASP.NET MVC , for that matter) work in a different way. URLs are mapped to methods on Controller classes. What this means is that instead of the code in a page being executed to generate a response, a method on a controller is executed instead. The mechanism that specifies how URLs are mapped to controller class methods is called Routing. The Routing system needs to be configured, and this is done once for the application. The recommended place for this type of initialisation code is the _AppStart file. If you do not have an AppStart file, create one. Add the following code to it. If you have an existing file, copy the using directives to the top of it and the single MapHttpRoute method call anywhere in your existing code block.
@using System.Web.Routing
@using System.Web.Http
@{
    RouteTable.Routes.MapHttpRoute(
             name: "DefaultApiRoute",
             routeTemplate: "api/{controller}/{id}",
             defaults: new { id = RouteParameter.Optional }
         );
}
The MapHttpRoute call defines a default route. The routeTemplate value specifies that the default URL for all Web API calls must start with api/, and that the next segment of the URL will determine which controller class should be used to serve the response. The specific method on the controller class that should be executed is determined by the HTTP verb used for the request. The last part of the routeTemplate is a parameter called id, which is optional.
Adding a Web API Controller
-
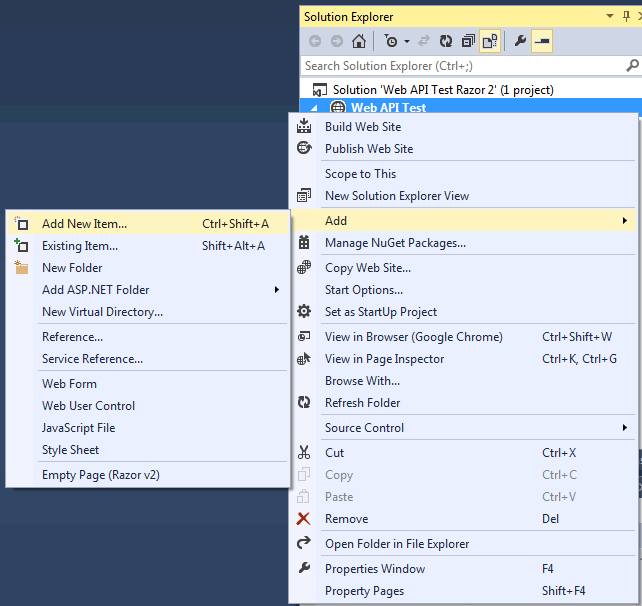
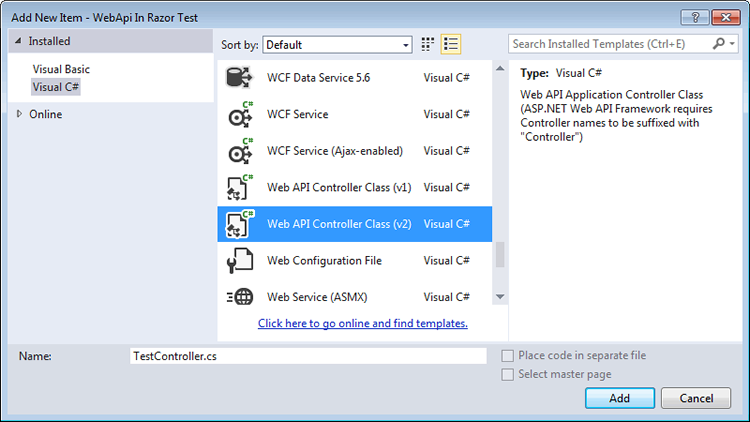
Right click on the web site in Solution Explorer and choose Add » New Item
-
Choose Web API Controller Class (v1) if you are working with Web Pages 2.
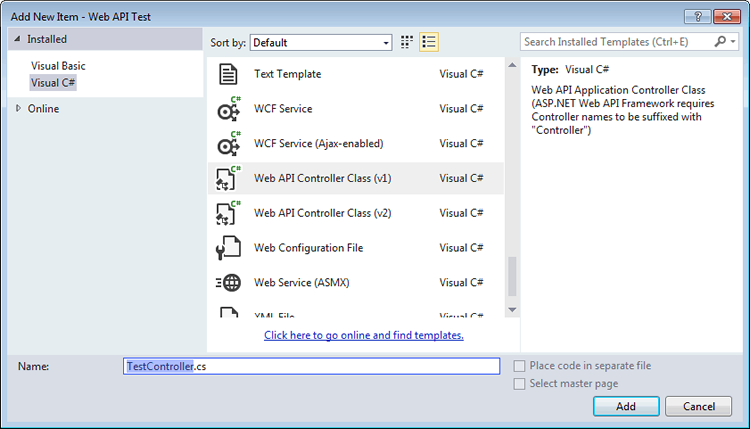
Choose Web API Controller Class (v2) if you are working with Web Pages 3.
-
Name the class TestController.
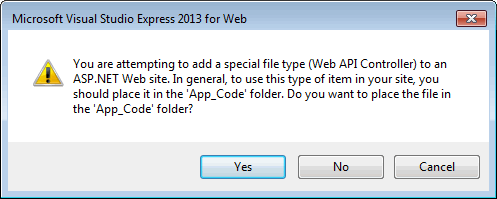
You will be prompted to save the class file in an App_Code folder. Click Yes to proceed.
The default code in the controller looks like this:
using System;
using System.Collections.Generic;
using System.Linq;
using System.Net;
using System.Net.Http;
using System.Web.Http;

public class TestController : ApiController
{
    // GET api/<controller>
    public IEnumerable<string> Get()
    {
        return new string[] { "value1", "value2" };
    }

    // GET api/<controller>/5
    public string Get(int id)
    {
        return "value";
    }

    // POST api/<controller>
    public void Post([FromBody]string value)
    {
    }

    // PUT api/<controller>/5
    public void Put(int id, [FromBody]string value)
    {
    }

    // DELETE api/<controller>/5
    public void Delete(int id)
    {
    }
}
The controller class includes two methods named Get with differing signatures. They both respond to requests made with the HTTP GET verb. The first one accepts no parameters and returns an array of strings which will be serialized to the format specified by the caller. The second method requires an integer as a parameter which will be used to filter the results to a single value. Other methods named Post, Put and Delete have no bodies.
Testing the controller
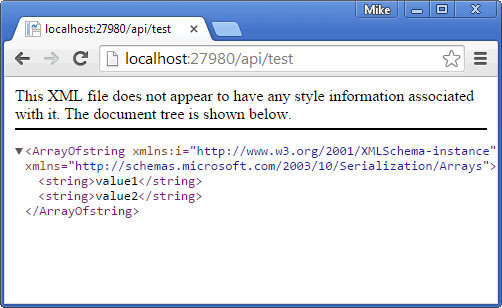
Launch your application in a browser. You can do this from within Visual Studio by pressing Ctrl+F5 to launch without debugging. To test the controller, navigate to http://localhost:nnnn/api/test (wherennnnis the port number your site runs on). Notice the last part of the URL - it matches the controller class's name (TestController), but without the "Controller" part. By default, your browser makes a GET request, and since you have not passed a parameter in the request, the routing system should match your request to the controller's Get method that takes no parameter and returns the string array in some form.
You should try testing the controller in a variety of browsers to explore how the response might differ between them. For example, if you make a request using Chrome or Opera, XML appears in the browser:
The default response in Internet Explorer is an invitation to open or save a file called test.json:

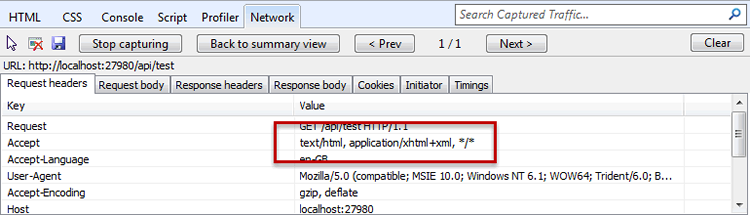
At the beginning of this article, I said that Web API delivers JSON by default. So why is that only true for Internet Explorer? Why do some other browsers elicit XML? The answer to that is Content Negotiation. The user agent (browser in this case) specifies the content type(s) it will accept by passing appropriate values in the Accept header of the request. Opera and Chrome both include application/xml within the Accept header by default. Opera even gives application/xml quite a high weighting of 0.9 (highest value is 1.0).
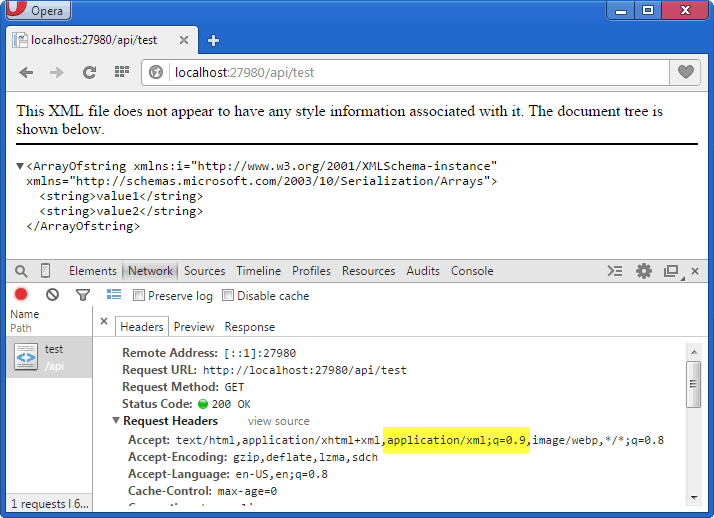
In the absense of any inclusion of application/json, Web API sees this as a request for data in XML format. Internet Explorer, on the other hand, doesn't include application/xml or application/jsonin the Accept header by default, so Web API defaults to JSON:
Working with data
In the next section, you will create a Web API controller that generates data and use jQuery to force it to deliver JSON.
-
Right click on the App_Code folder and choose Add » Class. Name the class
Movie. -
Replace the template code with the following:
using System;

public class Movie
{
    public int ID { get; set; }
    public string Title { get; set; }
    public DateTime ReleaseDate { get; set; }
    public string Genre { get; set; }
}
-
Add a Web API controller of the correct version for your target framework to the App_Code folder. Name the class
MoviesController. Replace the template code with the following:
using System;
using System.Collections.Generic;
using System.Linq;
using System.Net;
using System.Net.Http;
using System.Web;
using System.Web.Http;

public class MoviesController : ApiController
{
    List<Movie> movies = new List<Movie> {
        new Movie{ ID = 1, Title = "Taken", Genre = "Action", ReleaseDate = new DateTime(2008,9,26)},
        new Movie{ ID = 2, Title = "Django Unchained", Genre = "Western", ReleaseDate = new DateTime(2013,1,18)},
        new Movie{ ID = 3, Title = "Cars", Genre = "Animation", ReleaseDate = new DateTime(2006,7,28)},
        new Movie{ ID = 4, Title = "The Hangover", Genre = "Comedy", ReleaseDate = new DateTime(2009,6,12)},
        new Movie{ ID = 5, Title = "The Woman in Black", Genre = "Horror", ReleaseDate = new DateTime(2012,2,10)}
    };

    // GET api/<controller>
    public IEnumerable<Movie> Get() {
        return movies;
    }

    // GET api/<controller>/5
    public Movie Get(int id) {
        return movies.SingleOrDefault(m => m.ID == id);
    }

    // POST api/<controller>
    public void Post([FromBody]Movie movie) {
        movies.Add(movie);
        // Save changes
    }

    // PUT api/<controller>/5
    public void Put(int id, [FromBody]Movie movie) {
        Movie existingMovie = movies.SingleOrDefault(m => m.ID == id);
        existingMovie.Title = movie.Title;
        existingMovie.Genre = movie.Genre;
        existingMovie.ReleaseDate = movie.ReleaseDate;
        // Save changes
    }

    // DELETE api/<controller>/5
    public void Delete(int id) {
        movies.Remove(movies.SingleOrDefault(m => m.ID == id));
        // Save changes
    }
}
-
Add a new Empty Page (Razor v n) to your site and name it ApiTestPage.cshtml.
-
Replace the existing code with the following:
@{
    Layout = null;
}
<!DOCTYPE html>

<html lang="en">
<head>
    <meta charset="utf-8" />
    <title>My Site's Title</title>
    <script src="//code.jquery.com/jquery.min.js" type="text/javascript"></script>
    <script>
        $(function () {
            $('#btn-all').on('click', function () {
                $.get('/api/movies', function (data) {
                    $('#result').empty();
                    $.each(data, function (i, v) {
                        $('#result').html($('#result').html() + v.Title + '<br />');
                    });
                }, 'json');
            });
            $('#btn').on('click', function () {
                $.get('/api/movies/' + $('#MovieId').val(), function (data) {
                    $('#result').empty()
                    $('#result').html(data.Title +
                        '<br />' + data.Genre +
                        '<br />' + data.ReleaseDate);
                }, 'json');
            });
            $('#btn-delete').on('click', function () {
                $.ajax({
                    type: 'Delete',
                    url: '/api/movies?id=' + $('#MovieId').val()
                });
            });
        });
    </script>
</head>
<body>
    <button id="btn-all">Get all movies</button> <button id="btn">Get movie</button> <button id="btn-delete">Delete Movie</button>
    @Html.DropDownList("MovieId", Enumerable.Range(1, 5).Select(i => new SelectListItem{Text = i.ToString()}))
    <div id="result"></div>
</body>
</html>
You have defined a class called Movie that represents a movie object. You have also created a Web API Controller that generates a collection of Movie objects and makes them available individually via one of the Get methods (the one with the parameter called id) and all together via the other Get method. Usually you use a database for managing data. This example doesn't show that. It regenerates the collection of Movie objects on each request. The code in the Post, Put and Delete methods will actually add, update and remove movies from the collection, but without any way to persist these changes, you will need to use the debugger to be able to see the changes.
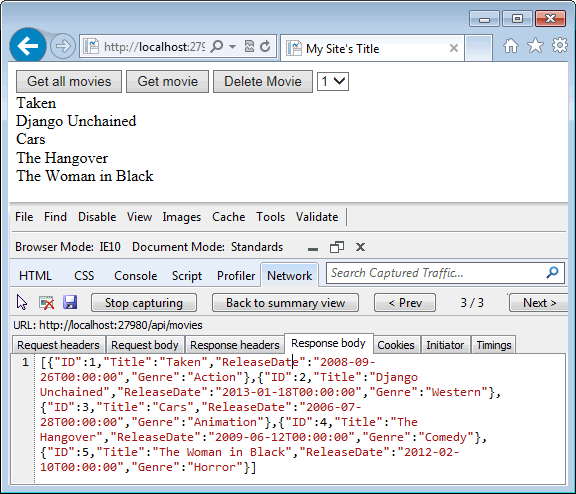
The UI of the page consists of 3 buttons and a drop down list featuring the numbers 1 to 5. The first button has the value Get All Movies and is wired up via jQuery to a click event handler that makes a request to the Get method that doesn't take a parameter. The jQuery.get() method is used to make an HTTP GET request to /api/movies. The title of each film returned by the API is printed out to the browser. The data type that the request expects in return is json, which is defined in the dataType parameter.
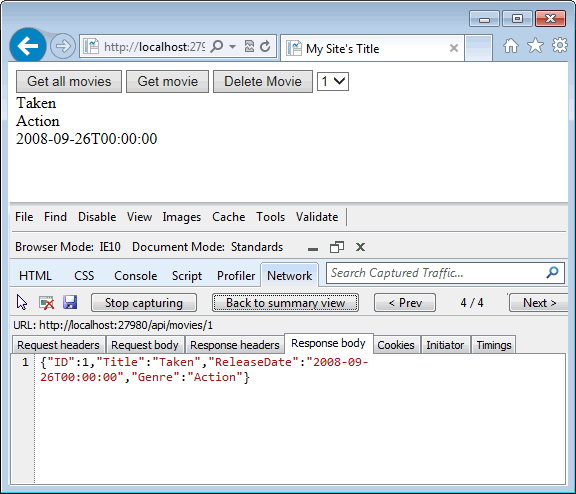
The next is labelled Get Movie, and its click event handler passes the number selected in the drop down list, which represents the ID of one of the movies. The event handler again requests the API to return json. It prints details for the selected movie to the browser:
The final button is wired up to a click event handler that makes use of the jQuery,ajax() method, which allows you to specify the HTTP verb used to make the request (as opposed to the get method which always uses GET).
.
$('#btn-delete').on('click', function () {
    $.ajax({
        type: 'Delete',
        url: '/api/movies?id=' + $('#MovieId').val()
    });
});
Using the Debugger
If you have ever used a debugger before, you can skip this section. Otherwise the next few steps will show you how to halt execution of a program that is being run in debug mode, and add a watch to a variable.
Locate the
Deletemethod in the MoviesController and add a breakpoint to it by either clicking on the method name once and hitting F9, or clicking once in the grey margin to the left of the method signature. Either way, a red dot should appear in the grey margin: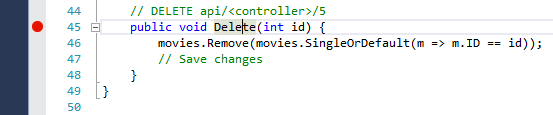
Start debugging the application by pressing F5.
-
When the home page appears in the browser, navigate to
http://localhost:nnnn/apitestpage, wherennnnrepresents the port number your application is using. -
Click the Delete Movie button, and bring Visual Studio to the front of your screen if it doesn't force its way there. Notice that the red dot now has a yellow arrow on it. This indicates that execution is currently halted at that breakpoint:

-
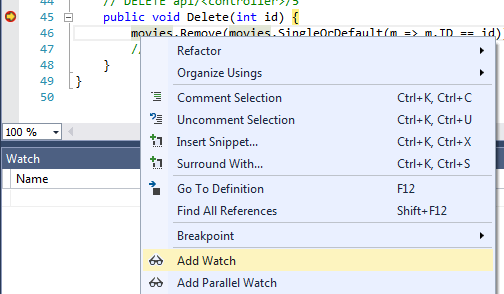
Right click on the word "movies" and choose Add Watch from the context menu:
-
A Watch Window will open (if it wasn't already open) and includes one entry for the
moviesvariable. The count of the collection is 5.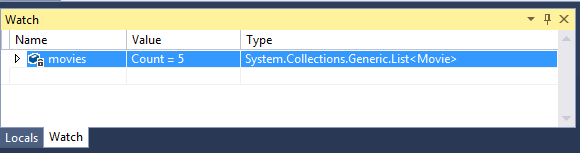
-
Press F10 once to advance execution by a line. The single line of code in the method body should be highlighted, and the Count value should still be 5.
-
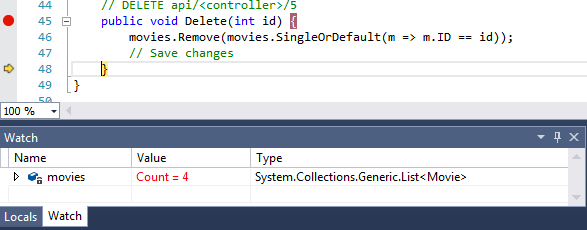
Press F10 once more to move execution forward another line. Now the closing brace of the method body should be highlighted and the Count value reduced by one to reflect that fact that a movie has been deleted from the collection:
Summary
Web API is a powerful framework for building data services over HTTP, and as this article shows, it is easy to add Web API to an existing Razor Web Pages site. If you would like to know more about using Web API, take a look at the ASP.NET Web API tutorials.
